Tummy tuck recovery tips: 10 Powerful Ways for Smooth Results
Your Road to Recovery: Essential Tummy Tuck Healing Tips
Tummy tuck recovery tips are crucial for achieving optimal results and minimizing complications after abdominoplasty surgery. Here’s a quick overview of the most important recovery strategies:
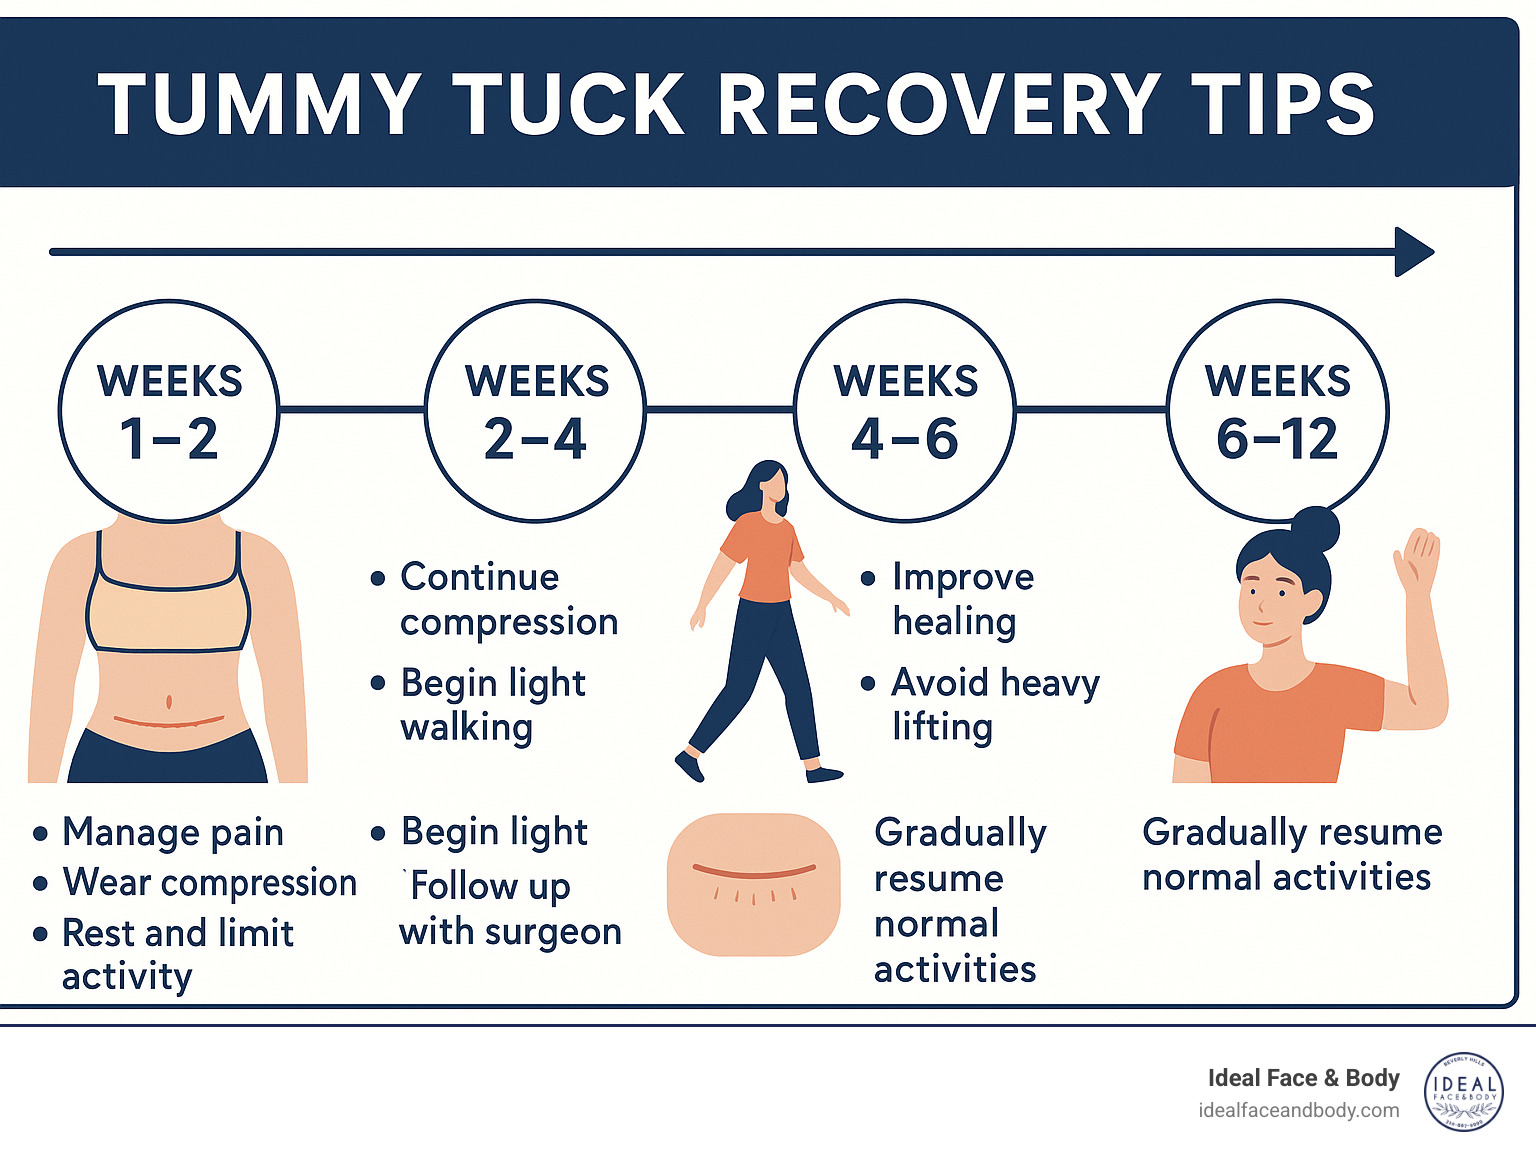
- Week 1-2: Rest, take prescribed medications, wear compression garment 23 hours daily
- Weeks 2-4: Begin gentle walking, continue compression wear, attend follow-up appointments
- Weeks 4-6: Gradually increase activity, maintain proper incision care, avoid heavy lifting
- Beyond 6 weeks: Begin transitioning to normal activities as cleared by your surgeon
A tummy tuck (abdominoplasty) is a major surgical procedure that requires significant recovery time and careful attention to post-operative care. While the prospect of a flatter, more toned abdomen is exciting, the healing process demands patience and diligence.
Understanding what to expect and following proper recovery guidelines can make all the difference between a smooth healing journey and one with complications.
As with any surgical procedure, your body needs time to heal. Most patients can return to work after 2-3 weeks, but complete recovery typically takes 6-8 weeks, with some residual swelling potentially lasting for months.
I’m Dr. Sarah Yovino, a double board-certified specialist in aesthetic procedures at Ideal Face & Body, where I’ve guided countless patients through successful tummy tuck recovery tips and protocols to ensure optimal healing and beautiful results.
Tummy tuck recovery tips basics:
– Non-surgical tummy tuck options
– how much does it cost to remove excess skin
– tummy tuck revision beverly hills
What Happens in a Tummy Tuck & Why Recovery Is Key
When I talk with my patients about tummy tucks, I always like to put things in perspective. Abdominoplasty isn’t just popular—it’s consistently in the top three plastic surgery procedures in America, with nearly 243,000 people choosing it in 2020-2021 alone. That’s a lot of transformed tummies! But understanding what actually happens during surgery helps you appreciate why the recovery process deserves your full attention.
Think of a tummy tuck as a three-part solution to common abdominal concerns. First, we remove that stubborn excess skin that simply won’t shrink back—especially after pregnancy or significant weight loss. Second, we repair separated abdominal muscles (that’s the diastasis recti that many moms experience). And third, we often incorporate liposuction to sculpt away persistent fat deposits that diet and exercise just won’t budge.
During your surgery, I’ll create a horizontal incision along your lower abdomen—placed strategically to hide beneath underwear or swimwear. Your navel gets a new position to match your newly flat tummy, and I’ll place temporary drainage tubes to prevent fluid buildup (more on caring for those later). The procedure finishes with layered sutures that support your new contour, followed by dressings and your first compression garment.
“I tell all my patients that what happens after surgery is just as crucial as what happens during it,” says Dr. Justin Yovino. “Even the most beautiful surgical result can be compromised if recovery guidelines aren’t followed carefully. Your healing journey directly shapes your final outcome.”
Tummy tuck recovery tips focus on navigating four distinct healing phases:
-
Immediate recovery (first 1-3 days): This is about managing discomfort, carefully handling drains, and accepting limited mobility. You’ll need someone’s help during this time.
-
Early healing (1-2 weeks): Pain typically decreases significantly, drains come out, and you’ll begin gentle movement—think short, slow walks around the house.
-
Intermediate phase (2-6 weeks): You’ll gradually increase activity while continuing to wear compression garments. This is when you’ll really start to see your new shape emerging!
-
Long-term healing (6+ weeks): You’ll transition back to normal activities as your surgeon clears you, while your scars begin their maturation process.
According to scientific research on tummy tuck recovery, patients who diligently follow proper recovery protocols experience significantly fewer complications and achieve better aesthetic outcomes. This isn’t just about comfort—it’s about protecting your investment in yourself.
The recovery timeline varies slightly for everyone, but the basic healing biology remains consistent. Understanding what your body needs during each phase will help you steer the journey with confidence and patience—and that’s exactly what we’ll cover in the tips ahead.
Tip #1: Prep Your Home & Mind Before Surgery
Recovery begins before your surgery even takes place. Setting up your home environment and mentally preparing yourself creates a foundation for smooth healing.

“I always tell my patients that preparation is half the battle,” I share during pre-operative consultations. “The more thoroughly you prepare your space and mindset, the less stressful your recovery will be.”
Your recovery station should be your personal healing sanctuary. Find a comfortable recliner or arrange bed pillows to support sleeping in a flexed position with knees bent. This position reduces strain on your incision and promotes better blood flow. Many of my patients tell me this simple setup made all the difference in their comfort.
Don’t overlook bathroom accommodations. A toilet seat booster might seem like a small detail, but you’ll appreciate it when you’re trying to sit and stand without engaging your core muscles. Trust me on this one!
Keep your entertainment hub within arm’s reach—books, devices, chargers, and remotes. Nothing’s worse than finally getting comfortable only to realize your phone is across the room. Create a hydration station with water bottles, straws, and healthy snacks nearby. Staying hydrated is crucial for healing, but frequent trips to the kitchen aren’t ideal in those first days.
Mentally preparing yourself is just as important as setting up your physical space. Set realistic expectations about discomfort and temporary limitations. Many of my patients find visualization techniques helpful—focusing on positive outcomes while acknowledging the recovery process. This temporary discomfort leads to long-lasting results.
Your support network will be invaluable. Arrange for someone to drive you home after surgery and stay with you for at least the first 24-48 hours. You’ll need help with meals, pet care, childcare, and daily tasks like showering and dressing changes. Don’t be shy about asking for help—your loved ones want to support you through this journey.
Pre-op checklist
Must-have supplies:
– Compression garments (as recommended by your surgeon)
– Loose, easy-to-put-on clothing (front-closing options are best)
– Gauze pads and medical tape for incision care
– Gentle, fragrance-free soap that won’t irritate healing skin
– Ice packs or frozen peas (always wrapped in cloth to protect your skin)
– Stool softeners (pain medication can cause constipation)
– Wedge pillows or regular pillows for elevation during rest
– Slip-on shoes to avoid bending
– Shower chair or stool for safety during bathing
– Lanyard or bathrobe tie for securing drains during showers
– Electrolyte drinks to maintain hydration and mineral balance
– Protein-rich, easy-to-digest foods to support healing
– Entertainment materials to keep your spirits up
– Journal for tracking your recovery progress and questions for follow-up appointments
Taking these preparatory steps will transform your recovery experience. Instead of scrambling for supplies or assistance, you’ll be able to focus entirely on healing. At Ideal Face & Body Beverly Hills, we’ve seen how patients who prepare thoroughly typically report smoother recoveries and greater satisfaction with their tummy tuck recovery tips journey.
Tip #2: Plan Time Off & Set Realistic Expectations
“When can I get back to my normal life?” This is the question I hear most often in my consultation room at Ideal Face & Body. The answer requires some honest conversation about what recovery really looks like.
Your body needs time to heal properly—rushing back to normal activities too soon isn’t just uncomfortable, it can compromise your results. Most of my patients need about 2-3 weeks away from work, depending on what you do for a living. If you’re mainly at a desk, you might manage returning after two weeks, though don’t be surprised if fatigue hits you like a wave in the afternoon. For those with physically demanding jobs, 3-4 weeks is much more realistic.
Let me walk you through what your six-week recovery journey typically looks like:
During weeks 1-2, you’ll experience the most discomfort and restricted movement. You’ll likely walk hunched over to protect your incisions, rely heavily on pain medication, and feel wiped out even after minimal activity like a short walk to the bathroom.
By weeks 2-4, you’ll notice gradually decreasing discomfort and be able to stand more upright. Your dependence on pain medication will decrease, and you’ll have energy for short periods before needing to rest again.
Around weeks 4-6, most patients experience minimal discomfort—mainly just tightness. You’ll stand almost normally, need little to no pain medication, and see your energy levels improving significantly day by day.
Beyond the 6-week mark, you’ll return to most normal activities, though you’ll still notice some swelling, especially after being active or at the end of the day. Your scars will continue to mature, and most patients feel their energy fully returns by 5-6 weeks.
“The body healing process isn’t just about your incision,” I often explain to patients. “Even when your pain is well-controlled, your body is directing enormous resources toward internal healing, which is why fatigue can be so surprising and persistent.”
While most visible swelling subsides within 6-8 weeks, don’t be alarmed if some mild swelling hangs around for 3-6 months, particularly after exercise or as the day progresses. This is completely normal and will continue to improve.
Before your surgery, go ahead and schedule all your follow-up appointments to keep your recovery on track:
– 1-week check-up (when we’ll likely remove your drains)
– 2-3 week visit (for suture removal if needed)
– 6-week appointment (to assess when you can return to more vigorous activities)
– 3-month follow-up (to evaluate your overall progress)
Setting realistic expectations isn’t about dampening your enthusiasm—it’s about giving you the knowledge to celebrate each milestone along the way. Tummy tuck recovery tips are most effective when you understand the natural timeline of healing and give your body the time it truly needs.
Tip #3: Incision, Drain & Scar Care Like a Pro
Let’s talk about something that might feel a bit intimidating at first – caring for your incision, drains, and eventual scar. I’ve guided hundreds of patients through this process, and trust me, with a few simple techniques, you’ll be handling this like a seasoned pro in no time.
Your incision is going to tell quite a story over the coming months. In those first few days after surgery, you’ll see some drainage and tenderness. By days 3-10, healing tissue starts forming its protective barrier. Around the two-week mark, we typically remove any non-dissolving sutures, and from there, your body continues strengthening the healing tissue for several weeks. The full scar maturation process takes patience – we’re talking 2-12 months before you see the final result.
Don’t be alarmed by numbness around your incision – it’s completely normal! Your abdominal skin might feel numb for quite some time as those nerves slowly regenerate. Many of my patients report occasional “zinging” sensations as nerves wake up, which is actually a positive sign your body is healing properly.
“The way you treat your incision during these first few weeks directly impacts how your scar will look for years to come,” I often remind my patients. “Simple daily care makes an enormous difference in your final results.”
For those Steri-strips or surgical tape placed directly over your incision, remember the golden rule: let them fall off naturally, which typically happens within 7-14 days. Resist the urge to peel them off! If the edges start curling up and bothering you, you can carefully trim those edges, but leave the rest in place.
Your daily incision care routine should be simple but consistent:
- Always wash your hands thoroughly before touching the area
- Clean gently with mild, low-sodium soap and lukewarm water
- Pat – never rub – the area dry with a clean towel
- Apply any prescribed ointments exactly as directed
- Cover with fresh gauze if you notice drainage or if clothing rubs against it
Those surgical drains might seem intimidating at first, but they’re actually your friends in the healing process. You’ll need to empty them 2-3 times daily, keeping a detailed log of the drainage amount. Keep the insertion site clean and secure the drains to prevent any uncomfortable tugging (a simple lanyard or bathrobe tie works wonderfully for this). If you notice sudden changes in drainage amount, color, or an unusual odor, give us a call right away.
Once your incision has fully closed (typically 2-3 weeks post-surgery), we can begin more active scar management. Silicone sheets or gel are your best friends for minimizing scarring. Gentle scar massage helps break up adhesions once I’ve cleared you for this activity. Sun protection is absolutely essential – keep that scar covered or use SPF 30+ for at least 12 months. Some patients also benefit from vitamin E or specialized scar products, which we can discuss during your follow-ups.
Consistent care leads to the best results. For more detailed information about optimizing your recovery journey, check out our resource on Quick Tummy Tuck Recovery.
Tummy tuck recovery tips: incision basics
Feeling numbness around your tummy tuck incision is completely normal and expected. This numbness can last anywhere from a few weeks to several months as your nerves regenerate and heal. Some patients worry about this sensation, but it’s actually part of the natural healing process.
Your Steri-strips play an important protective role during early healing. These small tape strips usually stay in place for 7-14 days, and it’s best to let them fall off on their own rather than removing them prematurely. If the edges begin to curl and become bothersome, you can carefully trim those edges with clean scissors, but leave the well-attached portions in place to continue supporting your incision.
Tummy tuck recovery tips often overlook the emotional aspect of seeing your incision for the first time. Many patients feel a mix of emotions – perhaps concern about the appearance or worry about proper healing. What you see in those early weeks is nowhere near your final result. The redness, puffiness, and prominence will all significantly improve with time and proper care.
For more comprehensive guidance on achieving the smoothest recovery possible, visit our detailed guide on Quick Tummy Tuck Recovery, where we share even more professional insights to help you steer this healing journey with confidence.
Tip #4: Wear Compression Garments Correctly
Let me tell you something that might surprise you—those tight, sometimes uncomfortable compression garments aren’t just a suggestion after your tummy tuck. They’re absolutely essential to your healing journey!
Think of your compression garment as your abdomen’s best friend during recovery. It hugs your newly contoured tummy, providing crucial support while everything heals underneath. At our Beverly Hills practice, we see the dramatic difference proper compression makes.
“I can always tell which patients have been diligent with their compression wear,” Dr. Justin Yovino often remarks during follow-up appointments. “Their swelling resolves faster, their contours settle more beautifully, and they typically report feeling more comfortable overall.”
Your compression schedule is pretty straightforward but requires commitment:
– Wear your garment 23 hours daily, removing it only for quick showers
– Continue this regimen for at least 4-6 weeks (some patients benefit from 8-12 weeks)
– Follow your surgeon’s specific timeline—everyone’s healing journey is unique
Your compression journey typically happens in stages. First, you’ll start with a firm abdominal binder immediately after surgery. Around weeks 2-3, we might transition you to a more comfortable compression garment. Finally, after 6-8 weeks, many patients can switch to commercial shapewear for ongoing support.
One major benefit of proper compression is preventing seroma—that’s when fluid collects under your skin, potentially requiring drainage procedures that nobody wants! Tummy tuck recovery tips from our most successful patients always include religious compression garment wear.
The fit of your garment matters tremendously. It should feel snug (like a firm hug) but never painfully tight. Check regularly for areas that might be folding or creating excessive pressure. Make sure it covers your entire surgical area, and don’t hesitate to call us if you notice skin irritation or significant discomfort.
A practical tip: have at least two compression garments on hand. This way, you can wear one while washing the other according to manufacturer instructions. Trust me, you’ll appreciate having a fresh, clean garment ready to go!
For those who’ve combined procedures like liposuction with their tummy tuck, compression becomes even more vital. You can learn more specifics about compression garment after abdominal liposuction on our website.
Those weeks of compression might feel restrictive, but they’re setting the stage for your beautiful long-term results. Your future self will thank you for sticking with it!
Tip #5: Move Early & Often to Prevent Blood Clots
While rest is important during recovery, some movement is essential—particularly to prevent potentially dangerous blood clots. Deep vein thrombosis (DVT) is a serious concern after any surgical procedure, and tummy tucks are no exception.

“I tell all my patients that movement is medicine,” I often emphasize during post-operative visits. “Even small movements can make a significant difference in preventing complications.”
From day one after your tummy tuck, you’ll want to incorporate gentle movement into your routine. Ankle pumps are your first line of defense—simply flex and point your feet 10-15 times every hour while you’re awake. This small motion helps keep blood circulating through your lower extremities. Pair these with calf squeezes, where you gently contract and release your calf muscles several times an hour.
As you begin to feel more comfortable, you can add gentle leg lifts while lying down. Just slowly raise and lower each leg a few times, being careful not to strain your abdominal muscles. The goal isn’t exercise—it’s circulation.
Your walking journey will begin with those first tentative steps to the bathroom. These short walks might feel challenging at first, but they’re incredibly important. Dr. Justin Yovino often reminds patients, “Those first walks around your home are doing more good than you realize—they’re helping prevent clots while kickstarting your recovery process.”
During the first few days, aim to get up and take short walks around your house every 2-3 hours. By the end of the first week, you should be gradually extending these walks by a few minutes each day. Weeks 2-3 might include brief outdoor strolls on flat surfaces, and by weeks 4-6, you’ll likely be returning to your regular walking routines—just avoid steep inclines until you’re fully cleared.
Compression stockings play a crucial supporting role in blood clot prevention. These thigh-high garments should be applied before you get out of bed in the morning and worn throughout the day, removing them only for showering and sleep. Proper fit is essential—they should feel snug but not painfully tight, with no rolling or bunching.
While moving, maintain a slightly bent posture during those early days to avoid putting tension on your incision. You’ll gradually straighten up as healing progresses and discomfort decreases.
Be vigilant about warning signs of DVT that require immediate medical attention: unusual swelling in one leg, pain or tenderness in the calf, warm or red skin on the leg, or visible surface veins. Don’t hesitate to contact us immediately if you notice any of these symptoms.
The science backs up these recommendations—regular movement significantly reduces clot risk after surgery. For more information on the research behind these protocols, visit the Scientific research on blood-clot prevention resource.
These small movements might seem insignificant, but they’re a vital part of your tummy tuck recovery tips toolkit. Your body will thank you for taking these simple precautions against one of surgery’s most serious potential complications.
Tip #6: Master Pain, Swelling & Constipation Control
Let’s talk about something that’s on every tummy tuck patient’s mind – discomfort. Managing it well isn’t just about comfort; it’s about creating the right environment for your body to heal beautifully. At Ideal Face & Body, we’ve helped countless patients steer this part of recovery with our comprehensive approach.
Pain management
The secret to staying comfortable isn’t about toughing it out – it’s about consistency. Take your prescribed medications on schedule, even if you’re feeling okay at the moment. This prevents the pain from building up and becoming harder to control.
“I always tell my patients that waiting until pain becomes severe before taking medication is like waiting until you’re parched to drink water,” says Dr. Justin Yovino. “Stay ahead of discomfort by following your medication schedule, and you’ll have a much smoother experience.”
As your recovery progresses, we’ll guide you in transitioning to over-the-counter options. Many patients also find relief through gentle breathing exercises or guided relaxation techniques that complement their medication routine.
Swelling control
Swelling is your body’s natural response to surgery, typically peaking around days 2-3 before gradually subsiding. Don’t be alarmed if you notice more swelling in the evenings or after activity – this is completely normal.
To keep swelling at bay, remember these four pillars of swelling management: cold therapy (ice packs wrapped in cloth applied in 20-minute intervals), elevation (keeping your upper body and legs slightly raised), compression (wearing your garments as directed), and gentle movement (to promote healthy circulation).

Tummy tuck recovery tips: beating swelling
What you eat and drink plays a surprisingly important role in managing swelling. Your body retains more fluid when you consume salty foods, so focusing on a low-sodium diet can make a noticeable difference in how you feel and look during recovery.
I always recommend my patients aim for about 2-3 liters of water daily. Proper hydration helps flush your system and reduces swelling more effectively than you might think.
Nature offers some powerful allies too – pineapple contains bromelain and papaya contains papain, both natural enzymes with anti-inflammatory properties that can help reduce swelling. Incorporating berries, leafy greens, and fatty fish into your meals provides additional anti-inflammatory benefits that support healing.
Constipation management
Let’s talk about something that many patients are surprised by – constipation after surgery can sometimes cause more discomfort than the surgical site itself! This extremely common side effect comes from a combination of pain medications and reduced activity.
Start taking stool softeners before surgery and continue throughout your recovery as needed. When your appetite returns, focus on fiber-rich foods like prunes, whole grains, and fruits. Walking, even just short distances around your home, helps stimulate your digestive system back into action.
“Many patients feel embarrassed to bring up constipation, but it’s something we discuss with almost everyone,” I often reassure my patients. “We have effective solutions ready, from gentle options to prescription remedies if needed.”
Your recovery is a holistic process. By managing pain, swelling, and constipation effectively, you’re creating optimal conditions for your body to heal beautifully and reveal your stunning tummy tuck results.
Tip #7: Fuel Healing With Smart Nutrition & Hydration
Your body needs premium fuel during recovery, just like a high-performance car needs quality gas to run smoothly. What you eat and drink after your tummy tuck can dramatically speed up healing—or slow it down if you make poor choices.
“I always tell my patients that nutrition is their secret weapon for recovery,” I often share during follow-up appointments. “Think of your body as a construction site—workers need the right materials to rebuild effectively.”
Protein becomes your best friend during healing. Your body craves it to repair tissues and rebuild muscle. Focus on easy-to-digest options like eggs, Greek yogurt, and lean chicken. For my vegetarian patients, I recommend lentils, chickpeas, and tofu as excellent alternatives. Many find protein smoothies particularly helpful during the first week when appetite may be low.
Your incision literally needs vitamin C to heal properly. This nutrient is essential for collagen production—the scaffolding that helps close your wound. Strawberries, kiwi, and bell peppers are fantastic sources that won’t bloat you with excess sugar.
Don’t forget about zinc, the unsung hero of wound healing. You can find it in seafood (especially oysters), lean meats, and pumpkin seeds. I’ve noticed patients who incorporate zinc-rich foods tend to have stronger, healthier-looking scars as they mature.
Probiotics deserve special attention, particularly if you’re taking antibiotics after surgery. These beneficial bacteria support gut health and can help prevent the digestive discomfort that often accompanies medication. A good quality yogurt with live cultures or kefir makes an excellent daily addition to your recovery diet.
Staying hydrated might sound obvious, but it’s incredibly important. Water helps transport nutrients to healing tissues and flushes waste products away. Aim for 2-3 liters daily, and consider electrolyte drinks if you’re struggling with regular water. Many patients find that setting a schedule—like drinking a full glass every two hours—helps them meet their hydration goals.
What you avoid can be just as important as what you consume. Alcohol is a definite no-go during recovery—it can interact with medications and impair healing. Nicotine is absolutely forbidden as it severely restricts blood flow to healing tissues. Even excessive caffeine can work against you by promoting dehydration when you need fluids most.
Smart preparation makes healthy eating much easier during recovery. Before your surgery date, consider:
- Stocking your freezer with nutrient-dense, portion-sized meals
- Setting up grocery delivery services for fresh produce
- Placing easy-to-reach healthy snacks near your recovery station
- Accepting offers from friends to bring meals (with gentle guidance on nutritious options)
Don’t worry if your appetite seems diminished initially—this is completely normal. Focus on quality rather than quantity, and try eating smaller meals more frequently. I’ve found that most patients see their appetite return to normal around the two-week mark as energy levels improve.
Tummy tuck recovery tips like proper nutrition aren’t just about comfort—they directly impact how quickly you heal and how good your final results look. Your body is working overtime to recover; giving it the right nutritional support is one of the kindest things you can do for yourself during this important healing period.
Tip #8: Sleep & Rest in Protective Positions
Getting quality sleep after your tummy tuck isn’t just about feeling rested—it’s when your body kicks its healing powers into high gear. But let’s be honest, finding a comfortable position can feel like trying to solve a puzzle when your midsection is tender and tight.
“The flexed position mimics the position you were in during surgery,” I often explain to my patients. “This reduces tension on your incision and muscle repair, promoting optimal healing.”
Your ideal sleeping setup should include an inclined torso using either a recliner (my patients’ favorite option) or a strategic arrangement of pillows that lifts your upper body about 30 degrees. Keep those knees bent with pillows underneath to take pressure off your newly repaired abdominal muscles. Add some side supports using firm pillows to prevent accidentally rolling during sleep, which could strain your incision.
Don’t forget to create a little bedside oasis with water, medications, and your phone within arm’s reach—midnight trips across the room are the last thing you need right now.
Your sleeping position timeline matters too. For the first 1-2 weeks, avoid lying completely flat on your back. Stomach sleeping is absolutely off-limits for at least 6-8 weeks (and honestly, most of my patients find they don’t even want to try it before then). Side-lying should be avoided for approximately 3 weeks, as it can create uneven tension on your healing tissues.
While that magical eight hours of sleep might seem impossible in the early recovery days, it’s worth striving for. Quality sleep reduces inflammation, speeds up tissue repair, improves how well you tolerate pain, boosts your immune function, and helps keep your emotions steady during what can be an emotional recovery journey. If you can’t sleep through the night, try taking short naps throughout the day to accumulate enough rest.
Many of my patients find these sleep aids incredibly helpful:
– Extra pillows of varying firmness (soft for comfort, firm for support)
– Specialized wedge pillows designed specifically for post-surgical recovery
– Body pillows for additional support and boundary-setting
– Sleep masks and earplugs to minimize disturbances
– White noise machines to improve sleep quality
If sleep continues to elude you, please talk to me before reaching for over-the-counter sleep aids. Some can interact with your pain medications or potentially affect your healing process.
Getting in and out of bed requires a bit of technique I like to call the “log roll”:
1. Roll onto your side while keeping your torso straight
2. Use your arms to push yourself up to a seated position
3. Swing your legs over the edge of the bed
4. Use arm strength rather than abdominal muscles to stand
This technique might feel awkward at first, but it becomes second nature quickly and protects your healing abdominal muscles and incision from unnecessary strain.
Your body is working overtime on repair, and quality sleep is like giving it the perfect conditions to do its best work. A little discomfort now in maintaining these protective positions will pay off with better healing and results in the long run.
Tip #9: Safe Timeline for Work, Driving, Exercise, Sex & Swimming
Getting back to your normal life is probably one of the things you’re most looking forward to after your tummy tuck. As much as you might be eager to jump back into your routine, your body needs time to heal properly. I’ve guided hundreds of patients through this recovery journey, and I’ve found that having clear expectations about activity timelines helps prevent frustration and complications.
“The number one reason I see patients experience setbacks is trying to do too much, too soon,” I often tell my patients during follow-up visits. “Your body will tell you when it’s ready if you listen carefully.”
For desk work, most patients can return after about 2 weeks, though you might consider starting with half days. Have your workspace set up ergonomically, with good back support and everything within easy reach. Even sitting at a desk requires more energy than you might expect during early recovery.
When it comes to driving, safety must come first. You should be completely off narcotic pain medications, able to wear a seatbelt comfortably, and capable of performing emergency maneuvers without hesitation. This typically happens around 2-3 weeks post-surgery.
Light cardio exercise can usually begin around 4-6 weeks, but start with walking before progressing to elliptical or stationary bike with no resistance. Your body will thank you for this gradual approach. Core-focused workouts should wait until at least 8-12 weeks post-surgery to protect your muscle repair.
Intimacy is a common concern many patients hesitate to ask about. Generally, you can resume sexual activity after about 4 weeks, but be mindful of positions that don’t strain your abdomen. Open communication with your partner about comfort levels is essential, and remember that pillows can provide helpful support.
For the swimmers among my patients, you’ll need to wait until your incisions are completely closed with no scabbing – typically 4-6 weeks. Start in clean, chlorinated pools rather than lakes or oceans, and don’t forget waterproof sunscreen to protect your healing scars.
| Activity | Typical Timeline | Readiness Indicators |
|---|---|---|
| Desk work | 2 weeks | Reduced pain medication, improved mobility |
| Light housework | 2-3 weeks | Ability to stand upright, minimal pain |
| Driving | 2-3 weeks | Off narcotic pain medication, able to turn and react quickly |
| Light cardio | 4-6 weeks | Surgeon clearance, minimal swelling |
| Swimming | 4-6 weeks | Incisions fully closed, no scabs |
| Sexual activity | 4 weeks minimum | Comfort level, surgeon clearance |
| Core exercises | 8-12 weeks | Complete healing of muscle repair |
| Heavy lifting (>10 lbs) | 6-8 weeks | Surgeon clearance |
| Full unrestricted activity | 12 weeks | Complete healing confirmed by surgeon |
Your exercise progression should follow a thoughtful path. Begin with gentle walking in the first couple of weeks, then gradually extend your walking time and distance as comfort allows. Between weeks 4-6, you can introduce low-impact cardio. Around weeks 6-8, moderate cardio and light upper body resistance become appropriate. Only after 8-12 weeks should you gradually reintroduce core exercises, with a return to your full routine after 12 weeks and surgeon clearance.
“I always remind my patients that recovery isn’t a race,” says Dr. Justin Yovino. “The patients who get the best long-term results are those who respect their body’s healing timeline.”
These are guidelines, not guarantees. Your personal healing journey may move faster or slower depending on your unique circumstances, surgical details, and how well you follow post-operative care instructions. Always prioritize the specific guidance from your surgeon over general timelines, and listen to your body’s signals above all.
Tip #10: Watch for Red Flags & Support Your Emotions
Recovery from a tummy tuck isn’t just a physical journey – it’s an emotional one too. While most patients sail through recovery without major issues, knowing what warning signs to watch for can provide peace of mind and ensure prompt treatment if needed.
Physical red flags
Your body has amazing ways of telling you when something isn’t right. As I tell my patients, “Your body speaks to you – our job is to listen carefully.”
If you notice a fever over 101°F, this could signal your body is fighting an infection. Similarly, increasing redness, warmth, or swelling that spreads beyond your surgical area needs immediate attention.
Unusual or foul-smelling drainage from your incision sites isn’t normal and should prompt a call to our office. Neither is severe pain that doesn’t respond to your prescribed medications – this could indicate a developing complication that needs addressing.
Some symptoms require emergency attention, like shortness of breath or chest pain. Don’t hesitate to seek immediate medical care if you experience these. Similarly, significant swelling in one leg could indicate a blood clot – something we take very seriously.
Watch for any opening of your incisions or separation of wound edges. Another concern is seroma formation – pockets of fluid that create noticeable bulges under the skin. These can usually be addressed easily in the office, but need prompt attention.
“Early intervention for complications leads to better outcomes,” Dr. Justin Yovino emphasizes. “Never hesitate to contact us with concerns, even if you’re unsure if what you’re experiencing is normal.”

Emotional wellbeing
The emotional roller coaster of recovery often catches patients by surprise. Post-surgical blues are remarkably common – that temporary feeling of “what have I done?” or unexpected sadness. This usually resolves as your energy returns and you start seeing results.
Body image adjustment takes time. When you first see your new abdomen, it won’t look like the final result. Swelling, bruising, and the shock of change can make it hard to appreciate the improvements initially. Be patient with yourself during this adjustment period.
Many patients struggle with impatience during recovery. When you’re in the middle of healing, progress can seem frustratingly slow. This is where photo documentation becomes valuable – comparing weekly photos helps you see changes that might be too subtle to notice day-to-day.
The mood swings many experience aren’t just in your head – they have real physiological causes. Pain medication, anesthesia aftereffects, disrupted sleep, and the body’s stress response to surgery can all impact your emotional state.
I find that patients who thrive emotionally during recovery often use these supportive strategies:
Journaling provides an outlet for processing your feelings and documenting your progress. Support groups, whether online or in-person, connect you with others who truly understand what you’re experiencing. Our office offers regular check-ins, including brief virtual consultations that can address concerns before they become worries.
Simple mindfulness practices like gentle breathing exercises can significantly reduce anxiety during recovery. And don’t forget to celebrate milestones – each week brings achievements worth acknowledging, from drain removal to your first short walk outside.
“The emotional recovery is just as real as the physical one,” I remind patients. “Be gentle with yourself and recognize that both aspects require time and care.”
At Ideal Face & Body, we understand that comprehensive support throughout your recovery journey includes both physical and emotional care. Our team remains available to address concerns, provide reassurance, and ensure you’re progressing appropriately through every aspect of healing. Your change journey deserves nothing less than our complete support.
Frequently Asked Questions About Recovery
How long will I feel tightness and swelling?
That feeling of tightness after your tummy tuck is completely normal – and I promise it won’t last forever! Most patients experience this sensation for about 6-12 weeks, with the most noticeable tightness occurring during the first month. Many of my patients describe it as feeling like they’re wearing an extremely tight belt or like they’ve just completed the most intense ab workout of their lives.
As for swelling, it follows a pretty predictable journey. The peak swelling happens around 2-3 days after surgery when you might look at yourself and wonder what you’ve done! But take heart – you’ll see significant improvement by the 2-3 week mark. Some residual swelling can hang around for 3-6 months, often fluctuating throughout the day (especially after activity or at the end of the day). Complete resolution of even the subtlest swelling can take up to a full year.
“Swelling is often more noticeable to the patient than to others,” I frequently reassure my patients who are concerned about their appearance. “The improvement you see at three months is approximately 80% of your final result, with subtle refinements continuing over the following months.”
When can I switch from binder to shapewear?
Most patients are eager to ditch their medical compression garments for something a bit more comfortable and stylish! This transition typically happens around the 6-8 week mark, but it’s important that this change is guided by your surgeon based on your individual healing progress.
How do you know you’re ready? Look for these signs: your incisions should be fully healed, you should have minimal tenderness in the surgical area, your swelling should have significantly decreased, and most importantly, you should have received the green light from your surgeon.
When shopping for shapewear to replace your medical compression garment, I recommend choosing seamless styles to avoid pressure lines on your healing tissues. The compression level should be appropriate – typically lighter than your medical garments but still supportive. Make sure the shapewear fully covers your surgical area, and you might want to consider options specifically designed for post-surgical use.
Many of my patients continue wearing shapewear for several months, especially during physical activity or on long days when they’ll be on their feet. It provides that extra bit of support and confidence as your body continues its healing journey.
What are signs I should call the surgeon immediately?
While some discomfort is expected during recovery, there are certain red flags that shouldn’t be ignored. I always tell my patients it’s better to be safe than sorry!
If you experience chest pain, difficulty breathing, loss of consciousness, or signs of stroke like facial drooping, arm weakness, or speech difficulties – don’t call us first, call 911 immediately.
For urgent concerns that require prompt attention from your surgical team, be on the lookout for:
A fever over 101°F, which could indicate infection, or increasing pain that isn’t controlled by medication. If your incision opens or separates in any way, that’s definitely worth a call. Excessive bleeding (more than slight spotting on dressings) or a significant increase in swelling (especially if it’s only on one side) should prompt immediate contact.
Other concerning symptoms include unusual drainage that’s cloudy, yellow/green, or foul-smelling, severe nausea or inability to keep fluids down for more than 24 hours, calf pain, swelling, or warmth in one leg (which could indicate a blood clot), or an inability to urinate despite drinking fluids.
“We would always rather hear from you unnecessarily than miss something important,” Dr. Justin Yovino often emphasizes to our patients. “Our after-hours line ensures you can reach a medical professional with any concerns.”
Keep your surgeon’s contact information readily available throughout your recovery – both the regular office numbers and after-hours emergency contacts. At Ideal Face & Body, we provide comprehensive contact information and support to ensure you’re never left wondering what to do if something doesn’t feel right.
Conclusion
Your tummy tuck journey doesn’t end when you leave the operating room—in many ways, it’s just beginning. The recovery process isn’t just something to endure; it’s an essential partnership between your body’s natural healing abilities and your attentive care. Following these tummy tuck recovery tips creates the foundation for the beautiful results you’ve been dreaming about.
At Ideal Face & Body in Beverly Hills, we see ourselves as your recovery partners, not just your surgical team. Our approach extends far beyond the operating room, providing you with personalized guidance and support throughout every stage of healing. We’ve walked this path with countless patients, and we’re committed to making your experience as comfortable and successful as possible.
“Recovery is where the magic happens,” Dr. Sarah Yovino often tells patients. “The surgery creates the framework, but how you heal determines the final masterpiece.”
Patience becomes your most valuable tool during this time. Your body is doing remarkable work behind the scenes, creating new blood vessels, repairing tissues, and adapting to its new contours. The improvements you’ll see week by week might seem subtle at times, but they’re building toward your final result. Many patients find that keeping a recovery journal helps them appreciate these gradual changes that might otherwise go unnoticed.
Your regular check-ins with our team aren’t just about medical monitoring—they’re celebrations of progress and opportunities to address any concerns before they become complications. We love seeing the growing confidence in our patients’ eyes as swelling subsides and their new contours emerge. Between appointments, our team is just a phone call away if questions arise or you need reassurance.
As you begin to enjoy your flatter, more toned abdomen, you’ll likely feel a renewed motivation to maintain your results. Once fully healed, gentle core-strengthening exercises and nutritious eating become natural companions to your surgical change. Your body has been through a significant journey, and treating it with care and appreciation helps preserve your results for years to come.
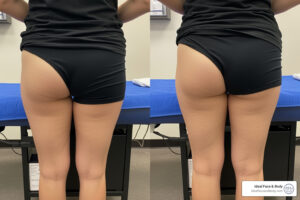
For inspiration during your recovery or to see what’s possible, browse our tummy tuck gallery. These before-and-after photos showcase the changes our patients have achieved by combining expert surgical care with dedicated recovery practices.
Your change journey is uniquely yours, with its own timeline and milestones. By embracing these tummy tuck recovery tips and working hand-in-hand with our team at Ideal Face & Body, you’re not just recovering—you’re revealing the confidence and contours that have been waiting for you all along.