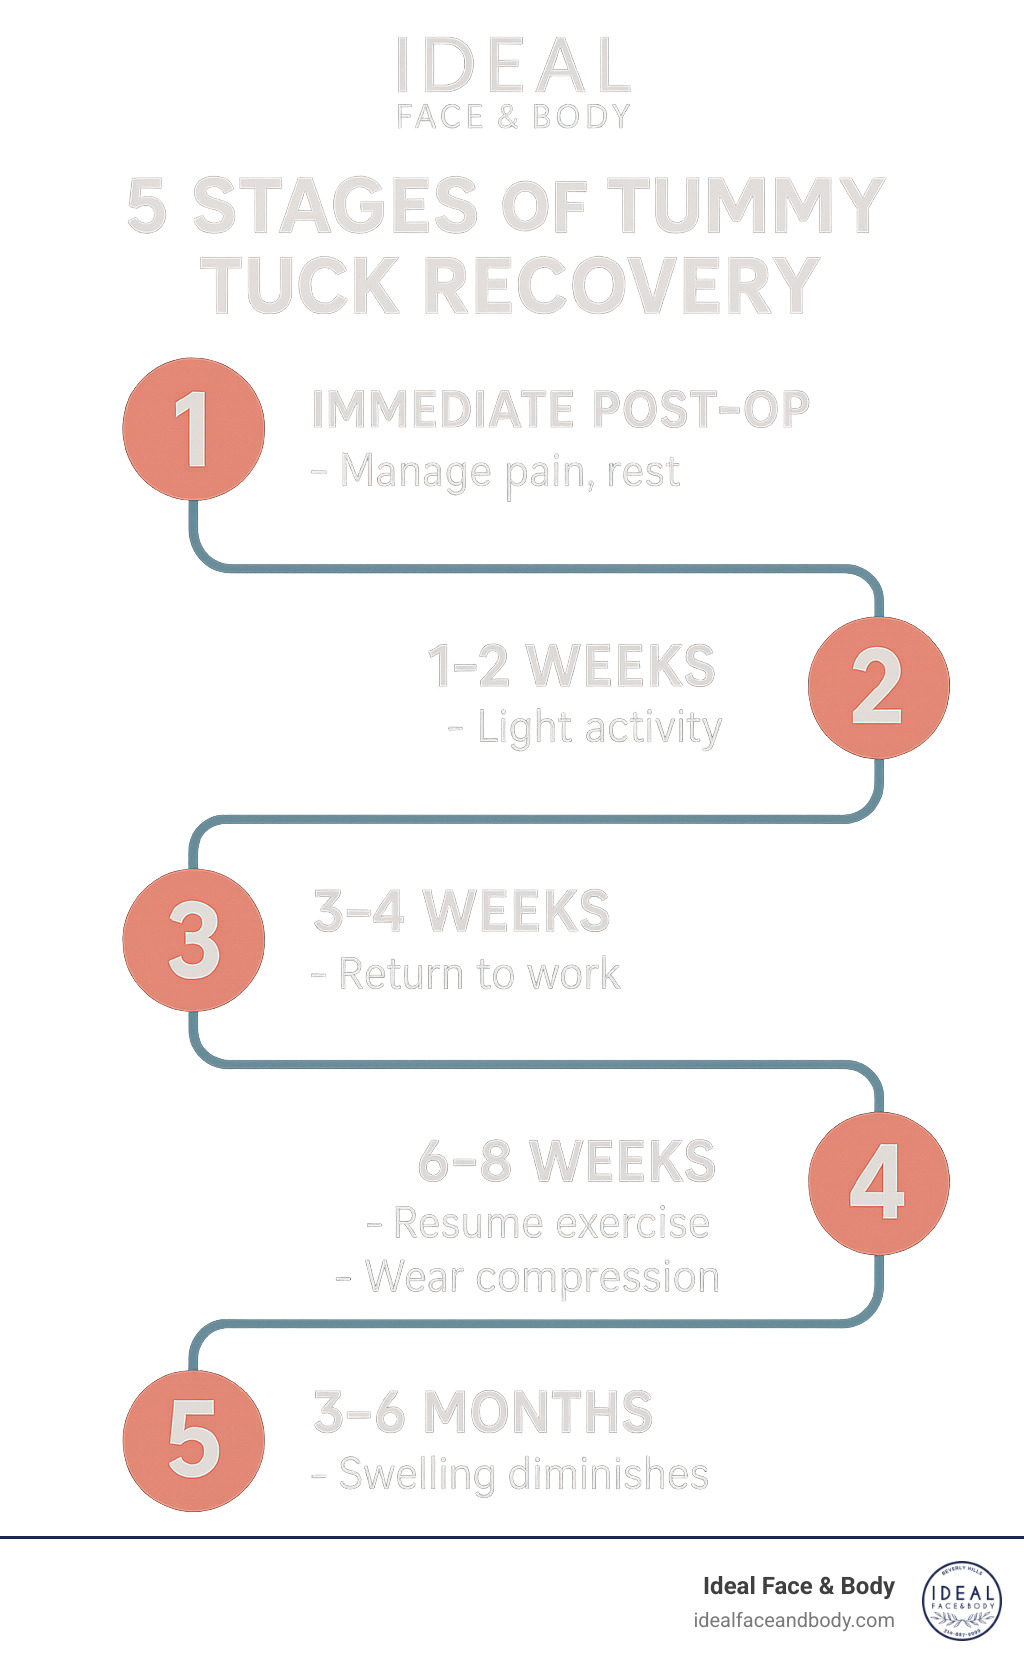
Quick tummy tuck recovery: 10 Powerful Tips for Fast Results
Fast-Track Your Healing After Surgery
Quick tummy tuck recovery is achievable with the right preparation and aftercare. Here’s what you need to know:
| Recovery Milestone | Typical Timeline |
|---|---|
| Basic mobility | 1-2 days |
| Drain removal | 3-14 days |
| Return to work | 2-3 weeks |
| Resume light exercise | 4 weeks |
| Full recovery | 6-8 weeks |
| Final results visible | 3-6 months |
A tummy tuck (abdominoplasty) ranks as the third most common plastic surgery procedure in the United States, with over 240,000 procedures performed annually. While it delivers transformative results by removing excess skin and tightening abdominal muscles, many patients worry about the recovery process.
The good news? Recovery doesn’t have to be as lengthy or difficult as you might think. With proper planning and the right techniques, you can significantly speed up your healing time while ensuring optimal results.
As a board-certified specialist at Ideal Face & Body, I’ve guided hundreds of patients through quick tummy tuck recovery using evidence-based protocols that minimize downtime and discomfort. Following years of mentorship with Dr. Justin Yovino, I’ve developed a comprehensive approach that helps patients return to their normal activities faster while achieving beautiful results.
Quick tummy tuck recovery basics:
– non-surgical tummy tuck options
– how much does it cost to remove excess skin
– tummy tuck revision beverly hills
Quick Tummy Tuck Recovery Starts Before Surgery
Your recovery journey begins long before you ever enter the operating room. The secret to healing faster isn’t just what you do after surgery—it’s how you prepare your body in the weeks leading up to your procedure.
“The groundwork for a quick tummy tuck recovery is laid weeks before surgery,” explains Dr. Sarah Yovino at Ideal Face & Body. “Our Beverly Hills patients who follow our pre-op protocols typically resume normal activities 30% faster than those who don’t.”
Think of your body as an athlete training for a big event. The better condition you’re in before surgery, the more smoothly your recovery will go.
Optimize Your Health Status
Being within 10-15 pounds of your goal weight for several months before surgery puts your body in prime healing condition. This stability isn’t just about looking good—it’s about creating the ideal internal environment for healing and maintaining your results long-term.
If you smoke, quitting completely at least 4-6 weeks before surgery is non-negotiable. Scientific research on smoking risks confirms what we see in practice: nicotine dramatically restricts blood flow to healing tissues, leading to slower recovery and higher complication rates. Your body simply cannot heal optimally while processing nicotine.
Starting a fitness routine focused on core strength and cardiovascular health pays huge dividends during recovery. Patients who enter surgery with stronger muscles and better circulation typically bounce back faster, with less fatigue and fewer complications. Even moderate exercise three times weekly in the months before surgery can make a remarkable difference.
“A fitter, healthier body entering surgery heals faster than one out of shape,” notes Dr. Justin Yovino. “I’ve seen the difference firsthand—patients who prioritize pre-surgical fitness often need less pain medication and return to normal activities sooner.”
Nutritional Preparation
Your body will need plenty of nutritional building blocks to repair tissue after surgery. Start boosting your immune system and healing capacity with these powerhouse nutrients:
Vitamin C becomes your best friend for collagen production and wound healing. Bright citrus fruits, strawberries, and leafy greens should become daily staples. Vitamin A supports tissue repair through foods like sweet potatoes, carrots, and spinach. Quality protein provides the essential building blocks for tissue regeneration—aim for lean sources like chicken, fish, eggs, and plant-based options if you prefer.
Hydration might be the most underrated recovery tool. Begin drinking more water 1-2 weeks before surgery. Well-hydrated tissues heal faster and help flush anesthesia from your system more efficiently. Most patients benefit from at least 64 ounces daily, more if you’re larger or very active.
Quick Tummy Tuck Recovery Prep Checklist
The week before surgery should be dedicated to setting up your recovery environment. Think of it as nesting—but for healing.
Having your compression garments ordered ahead of time prevents last-minute stress. Order two so you can wash one while wearing the other. Get all prescriptions filled before surgery day so they’re waiting for you when you return home.
Meal-prep focusing on high-protein options that can be easily reheated with one hand will be invaluable. When you’re tired and sore, having nutritious food ready to go makes healthy eating effortless.
Arrange for a dedicated caregiver for at least the first 48-72 hours. You’ll need help with everything from bathroom visits to medication management initially. Complete household chores ahead of time—clean sheets, stocked refrigerator, and a clutter-free path to the bathroom will make recovery much more comfortable.
One Beverly Hills patient shared: “The prep work felt excessive at first, but having everything ready allowed me to focus solely on healing. My recovery was so much smoother than friends who hadn’t prepared as thoroughly.”
Quick Tummy Tuck Recovery Shopping List
Your recovery station should be a command center with everything within arm’s reach. Loose, comfortable clothing that doesn’t press on your incision is essential—think button-front tops and drawstring pants a size larger than you normally wear.
A wedge pillow or recliner for sleeping semi-upright reduces strain on your incision and helps manage swelling. You’ll also want extra pillows to support your knees while keeping pressure off your abdomen.
Don’t forget stool softeners—they’re not the most glamorous item on your list, but they’re absolutely necessary. Anesthesia and pain medication cause constipation, which can lead to straining that jeopardizes your results.
Stock up on protein shakes, electrolyte drinks, and easy-to-digest foods. A grabber tool saves you from bending, while no-slip socks prevent falls during those early days when your balance may be compromised.
By investing time in preparation, you’re giving yourself the gift of an easier recovery. Your future self—the one with a beautifully contoured abdomen and minimal recovery stress—will thank you for the effort you put in now.
Nail the First 48 Hours

Those first two days after your tummy tuck? They’re make-or-break time for your healing journey. While this might be when you feel the most uncomfortable, how you handle these critical 48 hours can dramatically speed up your quick tummy tuck recovery and prevent complications that might slow you down.
Master Drain Management
Most patients leave surgery with temporary drains to prevent fluid buildup—these thin tubes might look intimidating, but managing them properly is simpler than you think.
“I always tell my patients that proper drain care is like insurance for your recovery,” says Dr. Sarah Yovino. “Those who diligently maintain their drains typically see them removed days earlier.”
Give your drains the attention they deserve by washing your hands thoroughly before handling them. Empty them 2-3 times daily, carefully recording both the amount and color of fluid (your surgeon will want to know this!). Keep the bulbs compressed to maintain proper suction, and secure them to your clothing with safety pins or clips to prevent any painful tugging sensations.
Remember to clean around insertion sites with hydrogen peroxide or whatever solution your surgeon recommends. This simple habit dramatically reduces infection risk and keeps your healing on track.
Compression Is Critical
That abdominal binder or compression garment isn’t just a suggestion—it’s your new best friend. Wear it exactly as prescribed, which typically means 23 hours a day, removing only for approved showering once your surgeon gives the green light.
“My compression garment felt like a warm hug,” shares one Beverly Hills patient. “Once I understood how much it was helping control swelling, I didn’t mind wearing it at all.”
Your compression garment works overtime to reduce swelling and bruising, support healing tissues, prevent fluid accumulation, minimize tension on your incisions, and help shape your beautiful new contours. Research shows patients who strictly follow compression guidelines experience up to 40% less swelling—that’s a recovery advantage you don’t want to miss!
Pain Management Protocol
The secret to comfortable recovery? Stay ahead of pain rather than chasing it. Taking medications on schedule—not waiting until discomfort becomes severe—sets a positive tone for your entire healing journey.
Take prescribed antibiotics religiously to prevent infection. Apply ice packs (never directly on skin) for 20 minutes every hour while awake to reduce swelling and numb discomfort. Support your incision with a pillow when coughing, sneezing, or laughing—this “splinting” technique prevents painful pulling on your surgical site.
Don’t skip those deep breathing exercises every hour! They might seem simple, but they’re crucial for preventing lung complications like pneumonia. And when it’s time to rest, sleep in a reclined position with knees slightly bent to reduce tension on your abdomen.
“The bathroom can be challenging those first days,” admits Dr. Justin Yovino. “Having a trusted helper for those first few trips makes a world of difference in preventing strain on your incisions.”
A recent patient shares: “Those first two days were challenging, but they passed quickly. Following the protocols from Ideal Face & Body made a tremendous difference in my comfort level—and looking back, they were just a tiny fraction of my journey to a transformed body.”
Manage Pain Like a Pro
Pain isn’t just an inconvenience after your tummy tuck—it’s actually a barrier to healing. When you manage discomfort effectively, your body can focus its energy on repair instead of fighting pain signals. The good news? With the right approach, you can stay comfortable while speeding up your quick tummy tuck recovery.
Strategic Medication Management
At Ideal Face & Body, we don’t believe in suffering through recovery. Our patients benefit from a thoughtful, multi-layered approach to pain control:
“We use what I call the ‘pain prevention’ strategy rather than just ‘pain management,'” explains Dr. Justin Yovino. “By staying ahead of discomfort, you’ll heal faster and have a much more pleasant recovery experience.”
This strategy typically includes long-acting local anesthetics injected during surgery that can provide relief for up to 72 hours—giving you a comfortable head start on healing. We’ll also create a personalized schedule combining non-opioid medications like anti-inflammatories and acetaminophen as your primary pain control method.
For most patients, we reserve opioid medications for breakthrough pain during those first few challenging days. If you’ve had muscle repair as part of your procedure, muscle relaxants can be incredibly helpful for relieving the tightness and spasms that sometimes occur.
The secret most patients don’t realize? Taking medication on schedule—even when you’re feeling okay—prevents pain from escalating and actually reduces your overall medication needs.
Beyond Medications
Your comfort toolkit extends far beyond pills. Small adjustments can make a huge difference in how you feel:
Finding your comfort sweet spot with proper positioning makes a world of difference. Keep your body slightly flexed when resting to reduce tension on your incision. Many patients create what I call an “aura of comfort” with perfectly positioned pillows supporting their knees, back, and sides.
Cold therapy works wonders for inflammation. Apply ice packs (always wrapped in a thin towel—never directly on skin) for 20 minutes every hour while awake during those first few days.
Don’t underestimate the power of your breath. Deep breathing exercises not only prevent lung complications but also trigger your body’s natural pain-control systems. Many patients find guided meditation apps helpful during recovery.
“I was surprised how much my regular breathing exercises helped with discomfort,” shares one Beverly Hills patient. “When I felt tightness increasing, five minutes of deep breathing often made a bigger difference than I expected.”
Gentle movement, like short walks around your home, improves circulation and reduces the muscle stiffness that can amplify discomfort. Start small and increase gradually as your comfort allows.
Preventing Medication Side Effects
The elephant in the room with pain medication? Constipation. After abdominal surgery, this common side effect can become particularly uncomfortable if not addressed proactively.
Start stool softeners before surgery and continue until you’re completely off pain medication. Stay well-hydrated with water and electrolyte drinks throughout your recovery. As soon as you’re eating normally, include fiber-rich foods in your diet—think prunes, pears, and oatmeal. Those short walks we mentioned? They stimulate bowel function too.
If these measures aren’t sufficient, gentle laxatives might be necessary—but always follow your surgeon’s specific recommendations.
Dr. Sarah Yovino notes, “Being proactive about potential side effects makes a tremendous difference in recovery comfort. The patients who follow our complete protocol typically report a much smoother experience.”
With these strategic approaches to pain management, you’ll not only feel better during recovery—you’ll actually heal faster on your path to enjoying your beautiful new contours.
Move Early, but Move Smart

That old saying about “motion is lotion” couldn’t be more true when it comes to quick tummy tuck recovery. Getting moving early—but in the right ways—can dramatically speed your healing process.
The Walking Protocol
“The patients who recover fastest are almost always the ones who get walking earliest,” says Dr. Justin Yovino. “But there’s a fine line between helpful movement and overdoing it.”
Your walking journey begins immediately after surgery, but with baby steps—literally. On day one, you’ll simply walk to the bathroom and back with someone helping you. By days 2-3, aim for short walks around your home every few hours while you’re awake.
During the first week, gradually increase your walking distance inside your home. One of our Beverly Hills patients shared, “I marked my progress by adding one more lap around my kitchen island each day. It sounds small, but those little victories added up quickly.”
By week two, you can venture outside for brief walks if weather permits. Weeks 3-4 are when you’ll really notice improvement, working up to 15-20 minute walks twice daily. Most patients return to their normal walking routine by weeks 5-6, though you should still avoid hills and high-intensity movement.
Remember to maintain a slightly hunched posture when walking for the first couple of weeks. Standing fully upright too soon can place excess tension on your incision line and potentially affect your final results.
DVT Prevention Exercises
Blood clots are a serious concern after any surgery, but especially abdominal procedures where movement might be limited. Perform these simple exercises hourly while awake to keep your circulation flowing:
Flex and point your feet repeatedly, gently stretch your calves, bend and straighten your knees while lying down, and regularly squeeze and release your buttock muscles. These small movements make a big difference in preventing potentially dangerous clots.
“I set an alarm on my phone every hour to remind me to do my ankle pumps,” one patient told us. “It became second nature by day two, and knowing I was actively preventing complications gave me peace of mind.”
Posture and Movement Techniques
How you move during recovery directly impacts how quickly your tissues heal. Protect your surgical site by using pillows to support your back and abdomen when sitting. When getting up from lying down, roll to your side first, then use your arms to push yourself up rather than using your abdominal muscles.
Avoid twisting movements or reaching overhead during the first few weeks. Many patients find a grabber tool invaluable for retrieving items from the floor without bending. When tackling stairs, take them one at a time while holding the handrail for support.
Dr. Sarah Yovino recommends keeping an activity log during your recovery: “Tracking your daily movement helps prevent both under-activity and overexertion—both of which can slow healing.”
One of the most common questions we hear is about returning to normal activities. While everyone’s recovery timeline varies slightly, most patients follow a predictable progression. For more detailed information about what to expect, visit our page on recovery time from body contouring procedures.
Movement during recovery isn’t about pushing your limits—it’s about finding the sweet spot that promotes healing without causing setbacks. As one patient put it, “The turtle wins this race. Slow, steady movement was my ticket to a quick tummy tuck recovery.”
Fuel Healing with Diet & Hydration
Your body is working overtime to heal after surgery, and what you eat directly impacts how quickly you recover. Think of food as medicine during your quick tummy tuck recovery – the right nutrients can dramatically accelerate healing while the wrong choices might set you back.
Protein: The Foundation of Healing
Your body literally needs building blocks to repair tissues, and protein provides exactly that. During recovery, aim to consume 1.5-2 times your normal protein intake.
“I tell my patients to think of protein as construction materials for their body’s repair crew,” explains Dr. Justin Yovino. “Without enough protein, healing slows down significantly.”
Great protein sources include chicken breast, salmon, eggs, Greek yogurt, and cottage cheese. For vegetarians, lentils, chickpeas, and tofu work wonderfully. Don’t hesitate to supplement with protein shakes if you’re struggling to eat enough solid food in the early days.
Try to space your protein intake throughout the day rather than loading up at one meal – your body can only process so much at once. Small, protein-rich meals or snacks every 3-4 hours keeps your healing machinery running smoothly.
Anti-Inflammatory Foods
Surgery creates inflammation – it’s a natural part of healing. But too much inflammation slows recovery. Certain foods have natural anti-inflammatory properties that can help:
Fatty fish like salmon and mackerel deliver powerful omega-3 fatty acids that calm inflammation. Colorful berries, leafy greens, and bell peppers provide antioxidants that fight oxidative stress. Turmeric, ginger, and garlic aren’t just flavorful – they contain compounds that actively reduce inflammation.
“One patient who followed our nutrition protocol religiously was back to work in just 12 days,” shares Dr. Sarah Yovino. “She made healing her full-time job, and it paid off with a remarkably quick tummy tuck recovery.”
Don’t forget about gut health! Probiotic foods like yogurt, kefir, and fermented vegetables support your intestinal microbiome, which plays a surprisingly important role in overall healing and immune function.
Foods to Avoid
What you don’t eat matters almost as much as what you do. Certain foods can sabotage your recovery by increasing inflammation, causing bloating, or promoting water retention.
Highly processed foods and excessive sugar trigger inflammatory responses that divert resources away from healing. High-sodium foods increase water retention and swelling – exactly what you’re trying to minimize after surgery. Alcohol interferes with both healing mechanisms and medications, creating a double negative. And those carbonated beverages you love? They can cause uncomfortable bloating in your already sensitive abdomen.
“The patients who struggle most with swelling are often those who can’t resist salty snacks,” notes Dr. Justin Yovino. “That bag of chips really does translate to extra days of swelling.”
Hydration Strategy
Water might seem basic, but it’s absolutely fundamental to a quick tummy tuck recovery. Proper hydration flushes anesthesia and medications from your system, reduces swelling, prevents constipation, supports all cellular functions, and helps maintain energy levels.
Aim for at least eight 8-ounce glasses daily – more if you’re larger or if it’s hot. Set hourly reminders on your phone if needed. Many patients find that a dedicated water bottle with time markers helps them stay on track.
“Plain water gets boring for most people,” acknowledges Dr. Sarah Yovino. “Try adding cucumber slices, lemon, or a splash of juice to make it more appealing.”
If you’re feeling particularly fatigued, especially in the first week, consider adding electrolytes to your water. Coconut water, sugar-free sports drinks, or electrolyte tablets can help restore balance and boost energy.
Scientific research on wound-healing nutrition confirms that specific nutrients significantly impact healing time. Vitamin C, zinc, and protein have particularly strong evidence supporting their role in wound repair – so load up on citrus fruits, pumpkin seeds, and lean meats to give your body everything it needs.
Every bite and sip is an opportunity to speed up your recovery or slow it down. Choose wisely, and you’ll be back to your normal routine faster than you might expect.
Care for Incisions & Prevent Infection

Taking care of your incision isn’t just about preventing infection—it’s about ensuring you get the beautiful, smooth results you’ve invested in. Proper wound care is absolutely essential for a quick tummy tuck recovery and those aesthetically pleasing results you’re hoping for.
Daily Incision Care Protocol
Once your surgeon gives you the green light to shower (typically 24-48 hours after surgery or when your drains come out), follow this simple but crucial routine:
Start by washing your hands thoroughly—this simple step prevents introducing bacteria to your healing incision. When showering, use only mild, unscented soap and lukewarm water. “I tell my patients to think of their incision like a delicate silk fabric,” says Dr. Justin Yovino. “You wouldn’t scrub silk, and you shouldn’t scrub your incision either.”
Allow the water to gently run over the incision area rather than directly scrubbing it. After showering, pat the area dry with a clean towel—never rub, as this can irritate the healing tissue. If your surgeon has prescribed specific ointments or dressings, apply them exactly as directed.
“One mistake I see too often is patients using harsh products like hydrogen peroxide or alcohol on their incisions,” notes Dr. Justin Yovino. “These actually damage healthy cells and can slow down healing. Simple soap and water is truly best.”
Drain Management Mastery
Those post-surgical drains might look intimidating, but they’re actually your friends in the healing process. They prevent fluid buildup that could lead to complications or slower healing.
Empty your drains when they’re about one-third to half full, or at minimum 2-3 times daily. Keep a small notebook to track the amount and color of fluid from each drain—this information is valuable to your surgeon and helps determine when the drains can be removed.
Clean around the insertion sites daily with gentle soap and water, keeping the area dry otherwise. Be sure to keep the bulb compressed (squeezed) after emptying to maintain proper suction. Many of our Beverly Hills patients find that using a lanyard or safety pin to secure drains to clothing prevents uncomfortable pulling sensations.
Typically, your drains will stay in place until the output decreases to less than 30cc per 24 hours, which usually happens between 3-14 days after surgery. When they’re removed, you’ll feel an immediate improvement in comfort and mobility.
Red Flags: When to Call Your Surgeon
While complications are rare with proper care, knowing when to seek help ensures a quick tummy tuck recovery. Contact Ideal Face & Body immediately if you notice:
Fever over 101°F often indicates your body is fighting an infection. Increasing redness, warmth, or swelling around your incision isn’t normal after the first few days and needs attention. Pus or foul-smelling discharge is a clear sign of infection, as is any separation of your incision.
Severe pain that isn’t controlled by your medication could indicate a complication. If one side of your abdomen becomes significantly more swollen than the other or you develop hard, painful areas under the skin, call us right away—these could indicate a seroma or hematoma that needs treatment.
“Early intervention for potential complications can prevent more serious issues and keep your recovery on track,” emphasizes Dr. Sarah Yovino. “Never hesitate to call us with concerns—that’s what we’re here for.”
Long-Term Scar Management
Around day 14, when surface healing is complete, you’ll transition to active scar management. This is when the real work of creating a beautiful, minimally visible scar begins.
Begin applying silicone sheets or gel once your incisions are fully closed—no scabs, drainage or openings. Wear these silicone products for 12-24 hours daily; they’re clinically proven to improve scar appearance. Protect the incision from sun exposure for at least 12 months, as UV rays can darken scars permanently.
Once approved by your surgeon (usually around 4-6 weeks), start performing gentle scar massage. Using your fingertips, apply gentle pressure and circular motions along the scar for 5-10 minutes twice daily. This breaks down scar tissue and improves flexibility.
“Patience with scar management pays off tremendously,” says Dr. Sarah Yovino. “The scar you see at six weeks will look completely different at six months, and even better at one year—especially with consistent care.”
One of our Beverly Hills patients shared: “I was so worried about my scar, but following Dr. Yovino’s scar protocol made an incredible difference. A year later, it’s barely noticeable—even in a bikini!”
Learn more about our comprehensive approach to tummy tuck procedures at Ideal Face & Body Tummy Tuck.
Compression Garments: Your Secret Weapon
If you’re looking for the unsung hero of quick tummy tuck recovery, look no further than your compression garment. This specialized piece of medical clothing might not win fashion awards, but it’s absolutely crucial for healing properly and achieving those stunning results you’re after.
The Science Behind Compression
“If you want to know the single most important thing you can do for a speedy recovery, it’s wearing your compression garment exactly as prescribed,” states Dr. Justin Yovino.
It’s not just about holding everything in place. These garments work their magic in multiple ways: they actively reduce swelling by preventing fluid buildup, improve blood circulation to healing tissues, and provide much-needed support to your weakened abdominal muscles. They also minimize tension on your incisions, help tissues bond to their new contours, and significantly reduce your risk of developing a seroma (that’s a pocket of fluid that can form under the skin).
Many patients initially see compression garments as a necessary evil, but quickly find they’re more like a comfort blanket during recovery.
Compression Timeline
Your relationship with your compression garment will evolve throughout your recovery journey:
| Recovery Phase | Compression Protocol | Benefits |
|---|---|---|
| Week 1-2 | 23 hours/day, removing only for showering | Maximum swelling control, incision support |
| Week 3-4 | 23 hours/day, can remove for 1-hour breaks | Continued support during early healing |
| Week 5-6 | 12+ hours/day, including during all activity | Support during increased activity |
| Week 7-8 | During exercise and as needed for comfort | Support during return to normal activities |
Many of our Beverly Hills patients actually choose to wear their compression garments even longer than recommended, especially during exercise. They find that the extra support provides both physical comfort and emotional confidence during the transition back to their normal activities.
Finding the Perfect Fit
The effectiveness of your compression garment hinges entirely on proper fit. Too loose, and you’ll miss out on all the benefits. Too tight, and you might actually impair circulation, which is the last thing you want.
“Too loose provides no benefit, while too tight can impair circulation,” explains Dr. Sarah Yovino. “We ensure each patient has properly fitted garments before surgery.”
Your perfect compression garment should feel snug but never painful. It should lie flat without wrinkles or bunching, cover your entire treated area, and be manageable to put on and remove (though this will always be a bit challenging in the early days). Most importantly, it needs to be comfortable enough that you’ll actually wear it for the prescribed amount of time.
Many of our patients find it helpful to have two garments so they can wash one while wearing the other. When selecting yours, look for soft, breathable fabric with flat seams to prevent pressure points. Adjustable closures are a bonus as they can accommodate your changing swelling, and moisture-wicking properties will keep you more comfortable during extended wear.
One patient shared: “My compression garment was uncomfortable at first, but I quickly realized it was reducing my swelling and pain. By week two, I felt strange without it!”
Think of your compression garment as your body’s best friend during recovery—it’s working around the clock to help you heal faster and achieve those beautiful results you’re dreaming about. The temporary discomfort is well worth the long-term benefits to your quick tummy tuck recovery.
Return to Work, Exercise & Life on Schedule
Returning to your normal routine after a tummy tuck requires patience and a strategic approach. With proper planning, you can safely resume activities while protecting your beautiful new results.
Work Reintegration Timeline
Most of our Beverly Hills patients find they can return to desk jobs within 2-3 weeks after surgery. Your personal timeline will depend on your healing progress and the physical demands of your work.
Week 1-2: This is your recovery cocoon phase. Focus entirely on healing, rest, and following your post-op instructions. Even remote work should wait—your body needs this time to establish the foundation for proper healing.
Week 3: Many patients can begin part-time work from home or short days at the office if your job is sedentary. Listen to your body and don’t push through fatigue.
Week 4: Full-time return to desk work becomes possible for most patients. Bring a small pillow to place between your abdomen and desk or seatbelt for added comfort. Standing desks can be particularly helpful during this transition.
Week 6+: More physically demanding jobs require longer recovery. If your work involves lifting, bending, or other physical exertion, you’ll likely need the full six weeks before returning.
“I recommend patients ease back with shorter workdays or remote options when possible,” advises Dr. Sarah Yovino. “Even when you feel ready, your body is still healing internally. That first week back can be surprisingly tiring.”
Driving Readiness Test
Before sliding behind the wheel (typically 2-3 weeks post-surgery), make sure you can pass this safety check:
- Can you wear a seatbelt comfortably across your abdomen?
- Are you able to turn and check blind spots without pain?
- Could you brake suddenly in an emergency without hesitation?
- Have you been off pain medications that cause drowsiness for at least 24 hours?
If you answered “no” to any of these questions, you’re not quite ready. Give yourself a few more days and reassess. Your safety—and the safety of others on the road—depends on your honest evaluation.
Exercise Progression
Patience with physical activity pays off in better results and fewer complications. Follow this gradual return to fitness:
Weeks 1-2: Walking is your only exercise, starting with short distances around your home and gradually increasing. This gentle movement improves circulation without stressing your incision.
Weeks 3-4: You can add light upper body movements that don’t engage your core. Think seated arm exercises or very gentle stretching of the shoulders and neck.
Weeks 5-6: Begin lower body exercises that keep your abdominal muscles relaxed. Stationary cycling with an upright posture and light leg lifts while lying down are good options.
Weeks 7-8: Now you can introduce light core activation exercises. Start with gentle pelvic tilts, shallow breathing exercises, and supported bridges.
Weeks 9-12: Gradually return to your full exercise routine, but continue to listen to your body. If something causes pain or pulling sensations, back off and try again in a few days.
“The patients who have the best long-term results are those who respect this progression,” explains Dr. Justin Yovino. “Rushing back to intense workouts can compromise your muscle repair and even affect your final aesthetic outcome.”
Intimacy and Social Activities
Sexual activity can typically resume around 4 weeks post-surgery, but communication with your partner is essential. Choose positions that don’t strain your abdomen or create pressure on your incision area. Use pillows for support and don’t hesitate to stop if you experience discomfort.
Swimming pools, hot tubs, and baths are off-limits until your incisions are completely healed and your surgeon gives explicit approval—typically 6-8 weeks after surgery. Even clean water carries infection risks for healing incisions.
Social events can be enjoyed when you feel comfortable, but be prepared for unexpected fatigue. Many patients find wearing compression garments under clothing provides comfort and confidence during social outings.
Travel should be approached cautiously. Short trips (under 2 hours) might be possible after 3-4 weeks, but longer travel is best delayed until at least 6 weeks post-surgery. When you do travel, get up and walk every hour to reduce blood clot risks.
One of our Beverly Hills executives shared her experience: “I scheduled my surgery during a natural break in my work calendar and returned part-time at three weeks. By six weeks, I was back to my normal routine, including light workouts—it was the perfect timeline. The temporary lifestyle adjustments were so worth the permanent results.”
Your body continues healing internally for months, even after you look and feel recovered. Continuing to wear compression garments during exercise and avoiding extreme exertion will help preserve your results for years to come.
Minimize Scarring for a Flawless Finish
Let’s be honest—while you’re excited about your new contours, the scar is probably on your mind too. The good news? With proper care, your tummy tuck scar will fade dramatically over time, and there’s plenty you can do to help the process along.
The Scar Timeline
Understanding how scars mature helps set realistic expectations for your quick tummy tuck recovery:
- Weeks 1-2: Your fresh incision will typically be covered with surgical tape, protecting the delicate new skin formation.
- Weeks 3-6: Don’t panic when your scar looks red and slightly raised—this is normal as healing progresses.
- Months 2-3: You might notice your scar becoming darker and firmer. This isn’t a setback; it’s part of the natural healing process.
- Months 3-6: Here’s where patience pays off—gradual fading and softening begins.
- Months 6-12: The waiting game continues with steady improvement in color and texture.
- 12+ months: Your final scar appearance establishes itself—for most patients, it’s a thin, flat line that’s significantly lighter than it was initially.
“Patience is truly key with scar healing,” explains Dr. Sarah Yovino. “I always tell my Beverly Hills patients that the most dramatic improvements happen between 6-12 months post-surgery, long after they’ve returned to normal life.”
Proactive Scar Management Protocol
Once your incision is fully closed—meaning no scabs or openings—it’s time to become proactive about scar care. This typically begins around the 2-3 week mark.
Silicone therapy is your new best friend. These sheets or gels create the perfect environment for scar healing by keeping the area hydrated and protected. Apply them daily for at least 12 hours for optimal results. Many of our patients find it easiest to apply silicone sheets before bed and remove them in the morning.
Sun protection isn’t just a good idea—it’s absolutely essential. UV exposure can permanently darken scars, making them more noticeable. Keep your scar completely protected from the sun for at least 12 months. This means SPF 50+ and physical coverage when outdoors.
Once Dr. Yovino gives you the green light (usually around 6-8 weeks), gentle scar massage can work wonders. Using your fingertips or a soft massage tool, apply light pressure in circular motions for 5-10 minutes daily. This breaks up forming scar tissue and improves flexibility.
Don’t underestimate the power of continued compression. Your compression garment helps flatten the scar and reduce tension across the healing tissues. Many patients continue wearing compression specifically over the scar area even after they’ve discontinued full garment wear.
Keep the scar well-hydrated with recommended products. Moisturized scars heal better than dry ones. Your surgeon will recommend specific products that won’t irritate the healing tissue.
“The patients with the best scars are those who are diligent about scar care for the full 12 months,” notes Dr. Justin Yovino. “It’s like tending a garden—consistency yields the best results.”
Advanced Scar Solutions
For patients seeking improved scar improvement, we offer several specialized options at Ideal Face & Body:
LED light therapy can significantly reduce redness and promote healing through cellular stimulation. These painless treatments take just minutes and can be started relatively early in your recovery.
Microneedling creates thousands of microscopic channels in the scar tissue, stimulating collagen production and breaking up thick scar tissue. Most patients begin these treatments around the 3-month mark.
Various laser treatments target different aspects of scar appearance. Vascular lasers reduce redness, while resurfacing lasers improve texture. These are typically started after the 3-month mark when initial healing is complete.
For scars that tend to become raised, steroid injections can help flatten hypertrophic or keloid formations. These quick in-office treatments are specifically targeted to problematic areas.
One of our Beverly Hills executives shared her experience: “I was initially so worried about my scar, but by following Dr. Yovino’s silicone protocol religiously and adding three laser treatments, it’s now so faint my husband can barely find it. Worth every minute of care I put into it!”
Scar management is a marathon, not a sprint. Your dedication to proper care during your quick tummy tuck recovery will pay dividends in the form of a nearly invisible reminder of your change.
For more comprehensive information on addressing scars and stretch marks, visit our detailed guide on how to get rid of loose skin and stretch marks.
Mind-Body Hacks & Warning Signs
A quick tummy tuck recovery isn’t just about physical healing—your mental and emotional well-being plays a crucial role too. At Ideal Face & Body, we’ve seen how patients who nurture their psychological health often heal faster and experience a smoother recovery journey.
Psychological Recovery Strategies
The emotional rollercoaster after surgery is completely normal. In those first few days, when you’re swollen and uncomfortable, this is temporary and part of the process toward your beautiful results.
Setting realistic expectations helps prevent disappointment and anxiety. Understanding that swelling can last for months and your final results may take up to a year to fully reveal themselves gives you the patience needed for this journey.
“Patients with a positive mindset and strong support system consistently recover faster,” observes Dr. Sarah Yovino. “Mental resilience truly translates to physical healing.”
Daily mindfulness practices can work wonders during recovery. Even just five minutes of deep breathing or guided meditation can reduce stress hormones that slow healing and increase pain perception. Many of our Beverly Hills patients download meditation apps specifically designed for surgical recovery.
One patient shared: “I took before and after photos every week and celebrated small victories like less swelling or standing a little straighter. These visual reminders of progress kept me motivated when recovery felt slow.”
Connecting with others who understand your experience provides invaluable emotional support. Whether through online forums or friends who’ve had similar procedures, sharing your journey makes it less isolating. Our office can even connect you with former patients who’ve volunteered to be recovery mentors.
Journaling your recovery creates a therapeutic outlet while documenting your change. Many patients are surprised when looking back at earlier entries to see how far they’ve come.
Creating a Healing Environment
Your surroundings significantly impact how quickly you bounce back. Transform your recovery space into a sanctuary that promotes healing and comfort.
Set up a comfortable recovery station with everything within arm’s reach—medications, water, snacks, entertainment, and your phone. This minimizes the need to get up frequently during those first crucial days.
Incorporate calming elements that engage your senses and promote relaxation. Soft music, gentle essential oils like lavender, or nature sounds can lower stress and even reduce pain perception. Your body heals more efficiently in a relaxed state.
Keep your environment comfortably cool to help manage swelling. Many patients find that a fan or lower thermostat setting makes a noticeable difference in their comfort level and reduces fluid retention.
Ensure you have proper lighting for checking your incision and managing drains. A good bedside lamp or portable light is essential for wound care, especially in the early days when you’re monitoring for potential issues.
Stock up on engaging entertainment options before surgery. Recovery boredom is real and can lead to depression or fixating on discomfort. Audiobooks, new streaming series, gentle crafts, or puzzles can make the time pass more pleasantly while keeping your mind positive.
Know the Warning Signs
While complications are rare, knowing when to seek help is essential for a quick tummy tuck recovery. Dr. Justin Yovino emphasizes, “Early intervention is key to preventing minor issues from becoming major complications. Never hesitate to call if something doesn’t feel right.”
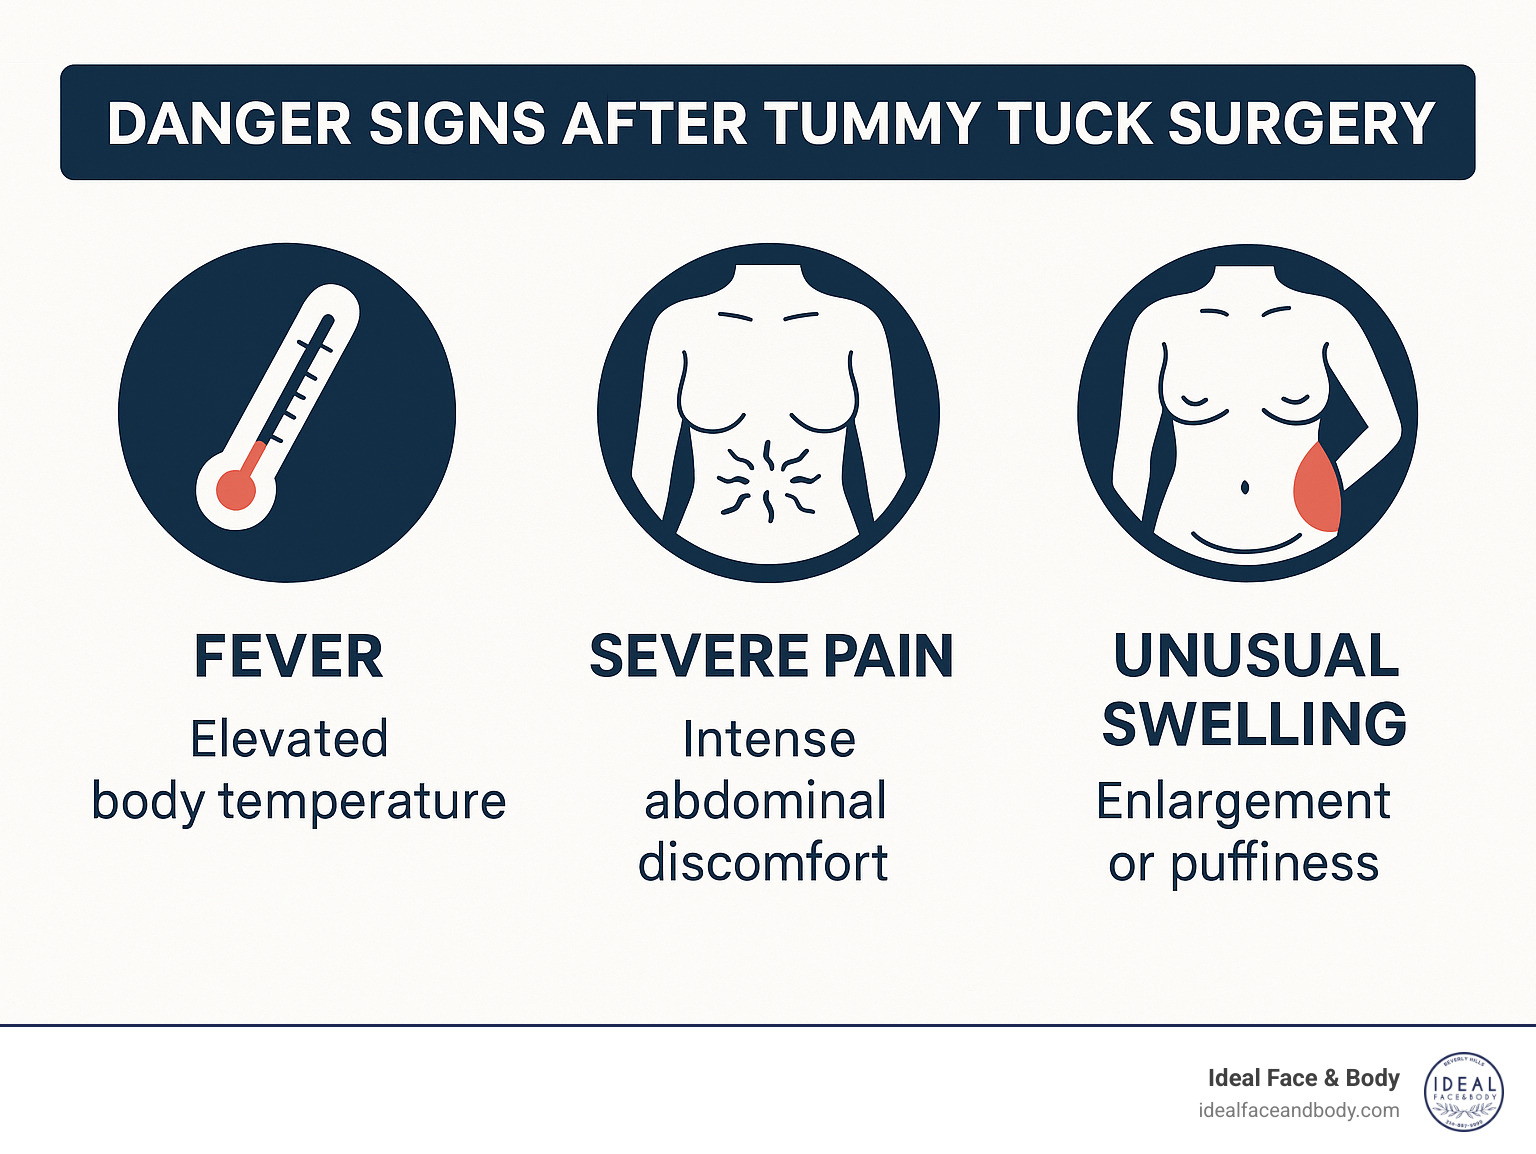
Contact Ideal Face & Body immediately if you experience:
Fever over 101°F often indicates your body is fighting an infection. Even mild infections caught early respond well to treatment, but left unchecked can become serious.
Increasing pain, especially if sudden or severe, needs prompt attention. While discomfort gradually decreases during normal recovery, pain that intensifies or changes in character warrants investigation.
Excessive swelling, particularly if one side is much larger than the other, could indicate a seroma (fluid collection) or hematoma (blood collection) requiring drainage.
Calf pain or swelling might signal a blood clot—a rare but serious complication. This requires immediate medical attention, especially if accompanied by warmth, redness, or tenderness in the leg.
Shortness of breath should never be ignored, as it could indicate a pulmonary embolism (blood clot in the lung), which is a medical emergency requiring immediate care.
Redness spreading from the incision often signals an infection. Take photos daily to monitor any changes, as this visual record helps your surgeon evaluate the situation even via telemedicine.
Incision separation where the wound begins to open needs prompt evaluation. This can happen if there’s too much tension on the incision or if an infection is developing.
Unusual drainage, especially if foul-smelling or discolored, suggests infection. Clear your phone’s camera roll before surgery so you can document any drainage concerns to share with your surgeon.
By staying attuned to both your emotional and physical needs during recovery, you’ll not only heal faster but also enjoy the journey toward your transformed body with greater peace of mind.
Frequently Asked Questions about Quick Tummy Tuck Recovery
How long before I can stand fully upright?
That hunched-over walk after a tummy tuck isn’t just for dramatic effect—it’s actually crucial for your healing! Most patients need to maintain a slightly bent posture for 1-2 weeks after surgery to protect both your incision and those newly repaired abdominal muscles.
“I always tell my patients that the hunched position feels awkward and maybe a bit embarrassing at first, but it’s absolutely essential for protecting your surgical results,” shares Dr. Sarah Yovino. “When patients rush to stand straight too soon, they risk compromising the muscle repair we’ve so carefully performed.”
Think of your abdomen like a book that’s been rebound—it needs time for the “glue” to set before you fully open it. You’ll gradually straighten up over those first two weeks, and most patients are walking normally by the end of week two.
Do I have to sleep on an incline, and for how long?
Yes, the reclined sleeping position is your new best friend for a while! Sleeping at about a 30-45 degree angle with your knees slightly bent is recommended for the first 2-3 weeks. This position works wonders for your quick tummy tuck recovery by reducing tension on your fresh incision, minimizing swelling, and making it much easier to get in and out of bed (which, trust me, you’ll appreciate during those middle-of-the-night bathroom trips).
A wedge pillow is the ideal solution, though many of our Beverly Hills patients also use adjustable beds or simply prop themselves up with several regular pillows. The pillow arrangement might feel a bit like building a fort at first, but finding your comfort zone is worth the effort.
“Most patients can gradually transition back to their normal sleeping position after about three weeks,” explains Dr. Justin Yovino. “Though interestingly, many tell us they continue to prefer sleeping slightly liftd for up to six weeks because it simply feels more comfortable.”
When will most of the swelling disappear?
Swelling after a tummy tuck follows a predictable pattern that helps you track your quick tummy tuck recovery progress. The first few days are the most dramatic, with swelling actually increasing until it peaks around day three. During weeks 1-2, you’ll experience significant swelling throughout your abdomen—this is completely normal and part of the healing process.
The good news is that weeks 3-4 bring noticeable improvement, though swelling is still present. By weeks 5-8, about 75% of the swelling typically resolves, and you’ll start getting a much clearer picture of your results. Between months 3-6, 90-95% of swelling disappears, revealing your new contours.
“I find that about 80% of swelling typically diminishes within the first two months,” notes Dr. Justin Yovino. “Though it’s important to understand that minor swelling may persist for up to a year, especially at the end of the day or after exercise.”
Several factors can extend your swelling timeline, including inconsistent use of your compression garment, high salt intake, inadequate hydration, or jumping back into physical activities too quickly.
One of our patients recently shared her experience: “The fluctuation surprised me most—I’d wake up looking great, but by evening, I’d be more swollen again. Dr. Yovino reassured me this was normal, and sure enough, by three months, this pattern had mostly resolved, and I could finally see my true results. The patience paid off!”
Your body is as unique as you are—healing timelines can vary from person to person. The key is following your surgeon’s instructions, staying patient, and celebrating each milestone along your recovery journey.
Conclusion
A quick tummy tuck recovery doesn’t happen by accident—it’s the result of thoughtful preparation, dedicated aftercare, and maintaining a positive outlook throughout your healing journey. At Ideal Face & Body in Beverly Hills, we’ve refined our recovery protocols through years of experience, helping hundreds of patients heal faster while achieving the beautiful results they desire.
Think of your recovery as a marathon, not a sprint. The patients who fare best are those who commit fully to the process—from pre-surgical preparation to long-term scar care. As Dr. Sarah Yovino often tells patients, “Your commitment to recovery directly influences your final results.”
The foundation for successful healing starts weeks before your surgery date. Optimizing your nutrition, quitting smoking, reaching a stable weight, and preparing your home recovery space all set the stage for a smoother post-operative experience. Your body needs resources to heal—protein for tissue repair, vitamins for immune function, and proper hydration to flush your system.
Those first 48 hours after surgery truly set the tone for your entire recovery. Staying ahead of pain, wearing your compression garments faithfully, and beginning gentle movement as directed can dramatically reduce complications and accelerate healing. As one of our Beverly Hills patients recently shared, “Following Dr. Yovino’s instructions to the letter during those first two days made all the difference in my recovery experience.”
Your healing body needs movement to thrive—just the right amount at the right time. Those early, short walks might seem insignificant, but they’re powerful medicine for preventing complications like blood clots while boosting circulation to healing tissues. As your recovery progresses, you’ll gradually return to your normal activities, with most patients back to their full exercise routines by 8-12 weeks.
Your body and mind heal together. Nurture your mental health throughout recovery by celebrating small victories, connecting with supportive friends or family, and practicing patience with the process. The temporary discomfort and limitations will pass, revealing your transformed contour that can last for years to come.
At Ideal Face & Body, we’re committed to supporting you through every step of your recovery journey. Our patients consistently tell us that the temporary challenges of recovery fade quickly, while their satisfaction with their new contours brings lasting confidence and joy.
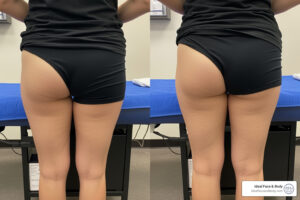
Ready to see what’s possible? Browse our gallery of successful tummy tuck changes at Ideal Face & Body tummy tuck results and contact us to schedule your personal consultation.
Your journey to a flatter, more contoured abdomen with a quick tummy tuck recovery is waiting for you—and we’re here to guide you every step of the way.