You've probably already scrolled through a gallery, comparing one “before” with one “after” and wondering whether the smoother outer-hip line is realistic for your body. The difficult part is that a photograph shows the contour, but not how much fat survived, when the image was taken, how the patient was positioned, or whether liposuction changed the waist at the same time.
A useful review of hip dip fat transfer before and after results has to go beyond visual appeal. The meaningful questions involve anatomy, donor fat, injection plane, healing, retention, follow-up timing, and the safeguards used during surgery.
Table of Contents
- What Hip Dip Fat Transfer Actually Does
- Anatomy of a Hip Dip and Why It Matters
- Case Studies From the Gallery
- What the Photos Cannot Show
- Fat Retention Over Time
- Candidacy and Patient Selection
- Comparing Procedural Approaches
- Safety Considerations Specific to Hip and Buttock Fat Grafting
- Recovery Timeline and Aftercare
- Evaluating Before-and-After Photos Like a Clinician
- Quick Reference for Prospective Patients
What Hip Dip Fat Transfer Actually Does
A patient may arrive wanting only a softer indentation between the waist and upper thigh. The procedure doesn't “build” a new hip from nothing. It uses liposuction to remove fat from a donor area, commonly the abdomen, flanks, or thighs, then reinjects that fat into the lateral hip depression to create a smoother transition. This is a form of autologous fat grafting, meaning the transferred tissue comes from the patient's own body.
The visual goal is usually contour refinement rather than the pronounced buttock enlargement associated with a full Brazilian Butt Lift. Some patients need only lateral-hip grafting. Others combine hip-dip correction with buttock shaping, waist contouring, or both. A gallery image can make those procedures look interchangeable, but the treated zones and intended result may be quite different.

The result is more than injected volume
The visible result depends on graft survival and donor-site contour, not on how much fat was placed. Removing fat from the flanks may make the waist look narrower, which can make the hips appear fuller even before considering the transferred volume. Meanwhile, some grafted fat is absorbed, and changes in body weight can alter the retained tissue later.
For readers comparing body-contouring information, a general resource such as this prevention guide from Empire Medical Wellness can also provide useful context about how changes in body composition may affect soft-tissue appearance. It isn't a substitute for a surgical consultation, but it reinforces an important point: body shape changes involve more than one isolated area.
A credible gallery should therefore identify whether the patient had hip-dip correction alone or a broader fat-transfer procedure. It should also state the follow-up interval, show consistent views, and avoid presenting one attractive result as a promise.
Anatomy of a Hip Dip and Why It Matters
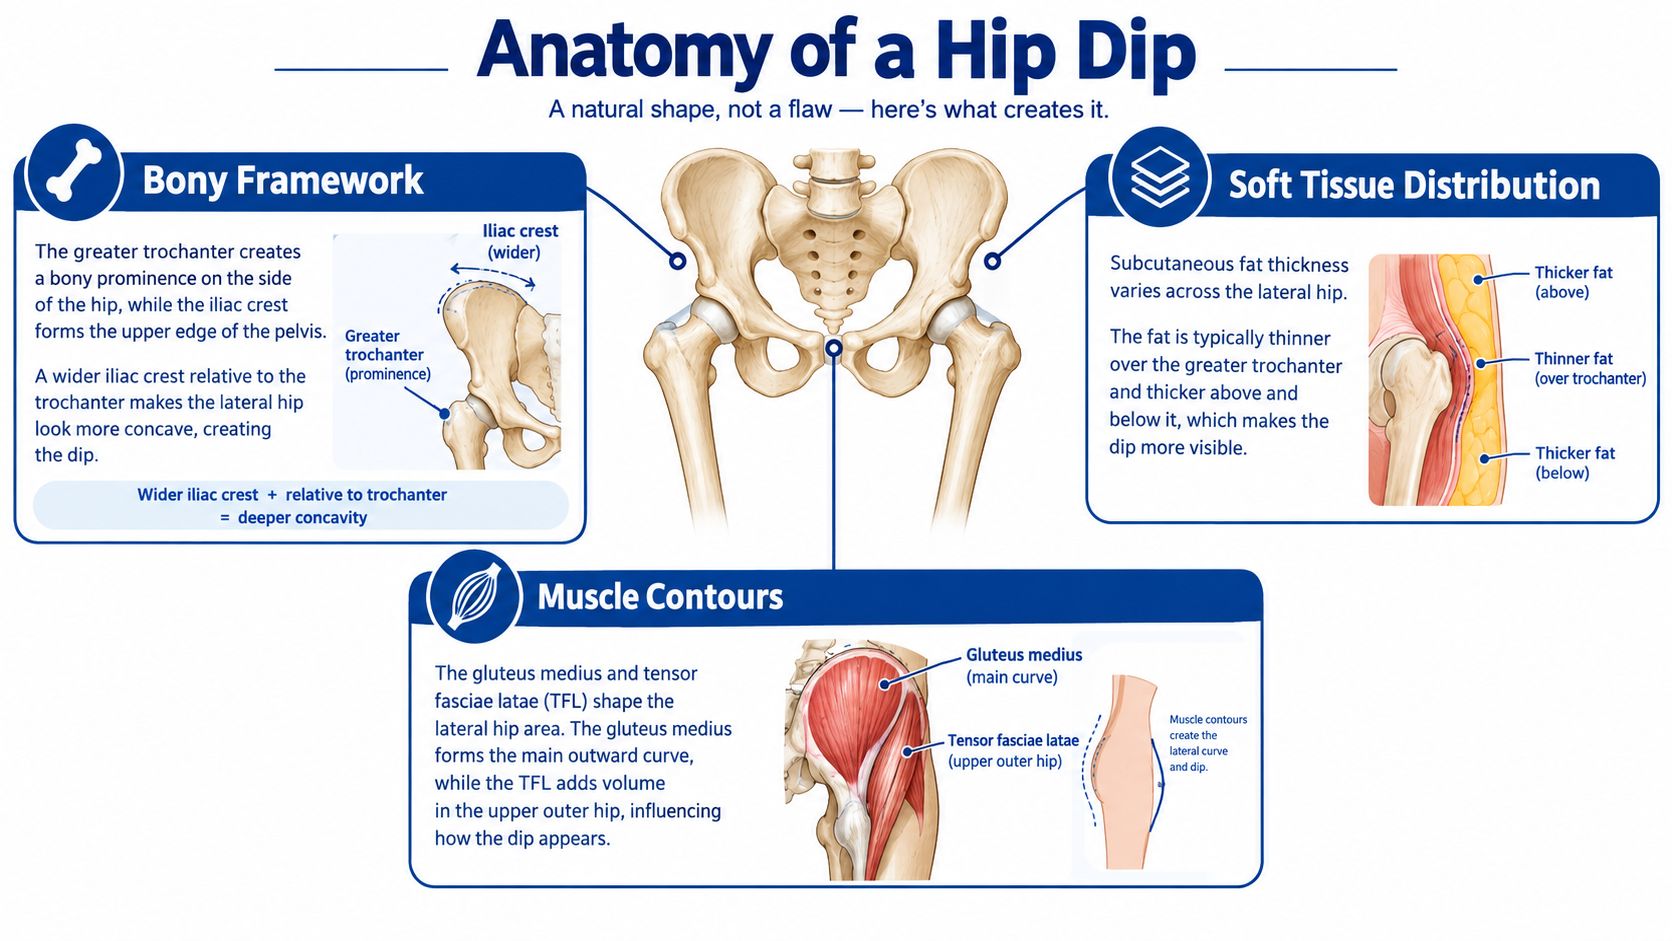
A hip dip is the inward curve along the outer hip, often described as a violin-shaped contour. It reflects the relationship between the pelvis, the upper femur, muscle contours, and the thickness and distribution of subcutaneous fat. The greater trochanter, a bony prominence at the upper femur, can create a visible transition beneath the soft tissue. The shape and width of the iliac crest also influence how the waist flows toward the thigh.
Three factors shape the starting contour
-
Bone sets the boundaries. Fat transfer can soften a depression, but it can't change the underlying pelvis or femur. A pronounced bony transition may limit how completely the line can be erased.
-
Soft tissue fills unevenly. The fat layer can be thinner over the trochanter and thicker above or below it. A surgeon places grafted fat strategically to blend those differences rather than adding a mound at the deepest point.
-
Muscle contributes to the outline. The gluteus medius and nearby muscle structures influence the upper outer-hip contour. Muscle development, fat distribution, skin quality, and skeletal shape all affect how much improvement fat grafting alone can provide.
That's why two patients with similarly named “hip dips” may need different plans. A body composition assessment can help explain broader fat distribution and tissue proportions. This plain-language overview of what body composition analysis reveals may help readers understand why a surgeon evaluates the whole body rather than one indentation.
Case Studies From the Gallery
Before-and-after galleries are most useful when the cases are compared by category, not ranked by how dramatic the change looks. The following examples are composite clinical scenarios designed to illustrate common patterns. They aren't individual promises, and they don't represent a guarantee of any particular volume, timeline, or result.
A subtle hip-dip-only correction
The first patient had a relatively stable body weight, a visible depression over each lateral hip, and enough usable fat in the flanks and outer thighs for localized contouring. The goal wasn't a larger buttock. It was a softer line from the waist through the outer hip and into the upper thigh.
The after image showed a gentler transition and less shadow at the deepest part of the depression. The waist changed modestly because the donor area was treated, but the buttock projection remained close to the starting shape. The key limitation was skeletal. The contour was smoother, not completely straight, because the underlying bony anatomy still influenced the outline.
A combined buttock and hip-dip contour
The second patient wanted both lateral-hip filling and more overall buttock volume. Fat was harvested from the abdomen and flanks, allowing the surgeon to address the donor contour while shaping the buttocks and hips. The after photograph looked more dramatic than the first example because it reflected more than one visual change, including a narrower-looking waist and increased buttock fullness.
The important comparison is not the final silhouette. A viewer should ask whether the gallery labels the treatment as combined buttock and hip contouring, identifies the follow-up interval, and shows the same posture and lighting. Without that information, the image may make the transferred volume appear responsible for a change that also came from fat removal around the trunk.
A revision after poor retention
The third patient had undergone a previous fat transfer elsewhere and felt that the lateral-hip correction had largely faded. The revision plan began with an assessment of the remaining donor fat, prior liposuction patterns, scar tissue, asymmetry, and the amount of safe subcutaneous space.
The revision result was intentionally conservative. One side required more attention because the original transfer had not retained evenly. The after images showed improved balance and a softer depression, but not a perfectly identical left and right contour. That's a realistic outcome. Revision surgery often involves correcting what remains, not recreating an untouched starting anatomy.
What the Photos Cannot Show
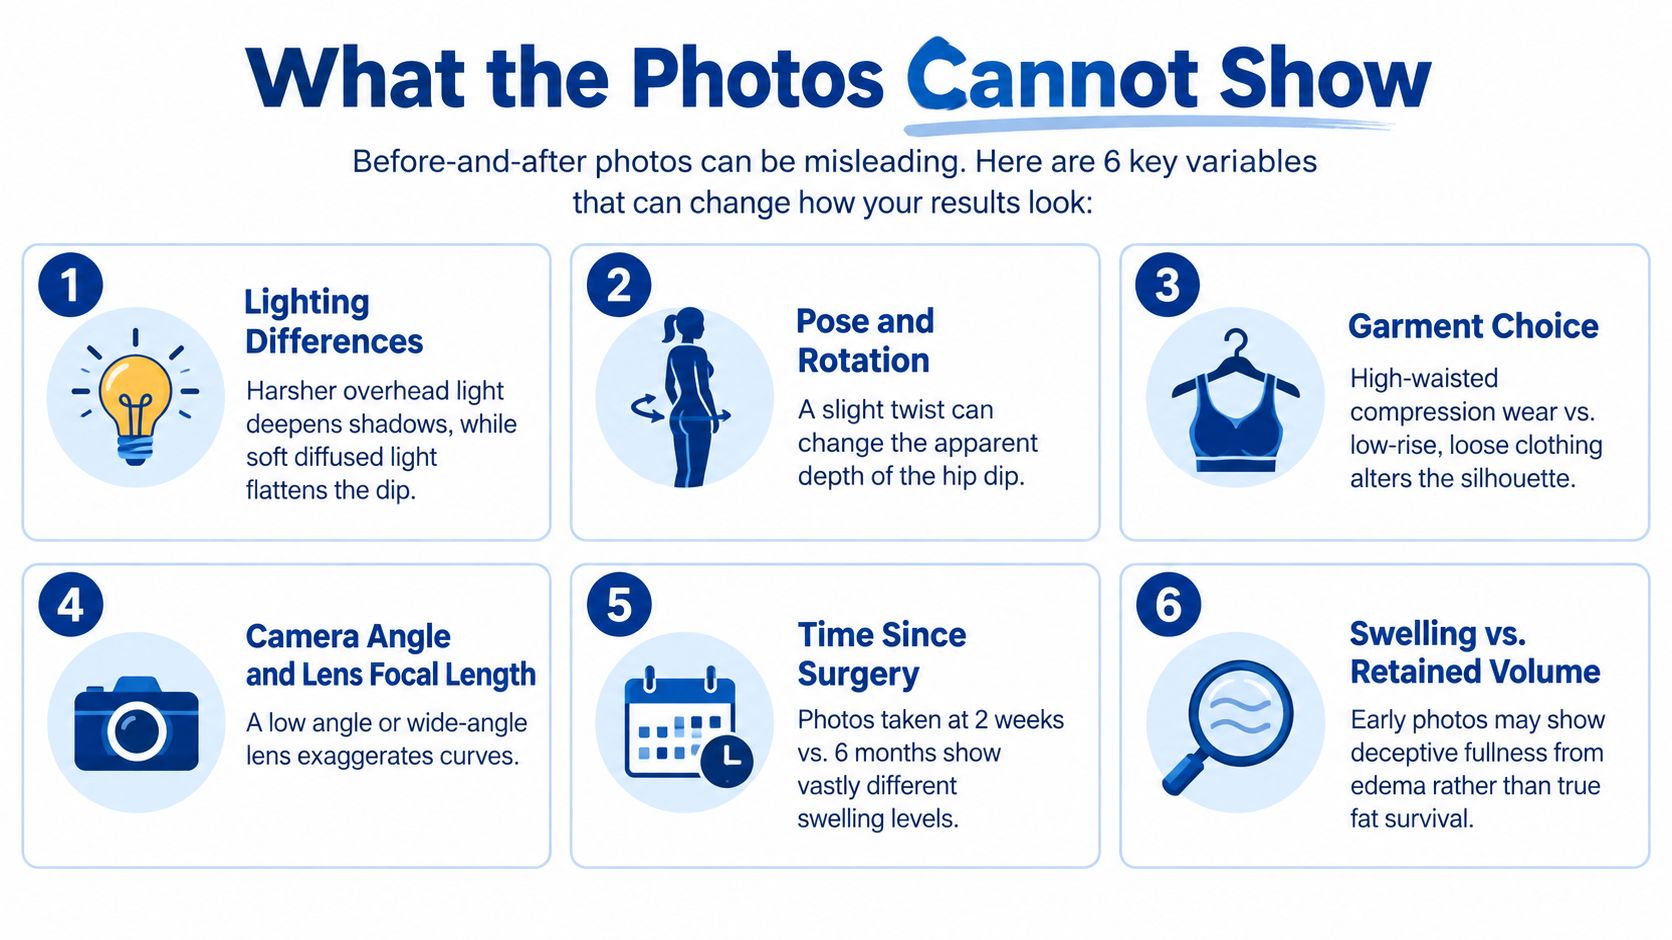
A photograph can make a contour look smoother while concealing the conditions that produced the image. Lighting matters. Hard overhead light can deepen shadows in a depression, while diffused light can make the same area appear flatter. A small rotation of the pelvis, a change in stance, a high-waisted garment, or a different camera height can also alter the apparent hip line.
The timing may be even more important. Early fullness can reflect swelling and edema as well as grafted fat. A systematic review of non-enriched fat grafting reported mean weighted volume retention of 41.63% at a mean follow-up of 13.9 months. The review involved facial grafting rather than hip-dip correction, so it shouldn't be treated as a direct hip-dip prediction, but it demonstrates why early images can overstate the stable result (systematic review of fat-grafting retention and complications).
A practical viewing test
When you examine a gallery, look for:
- Consistent positioning: Front, back, side, and three-quarter views should use comparable rotation and stance.
- A stated interval: “After” should include the time since surgery, not just a label.
- Treatment clarity: The caption should distinguish hip correction from buttock augmentation and waist liposuction.
- Stable documentation: A comparison slider is useful only when the underlying photographs are standardized. This guide to the comparison slider offers helpful background on presenting paired images clearly.
A six-week image may show attractive fullness that changes as swelling resolves and some grafted fat is absorbed. A later photograph may look less dramatic but provide a more honest view of the settled contour.
Fat Retention Over Time
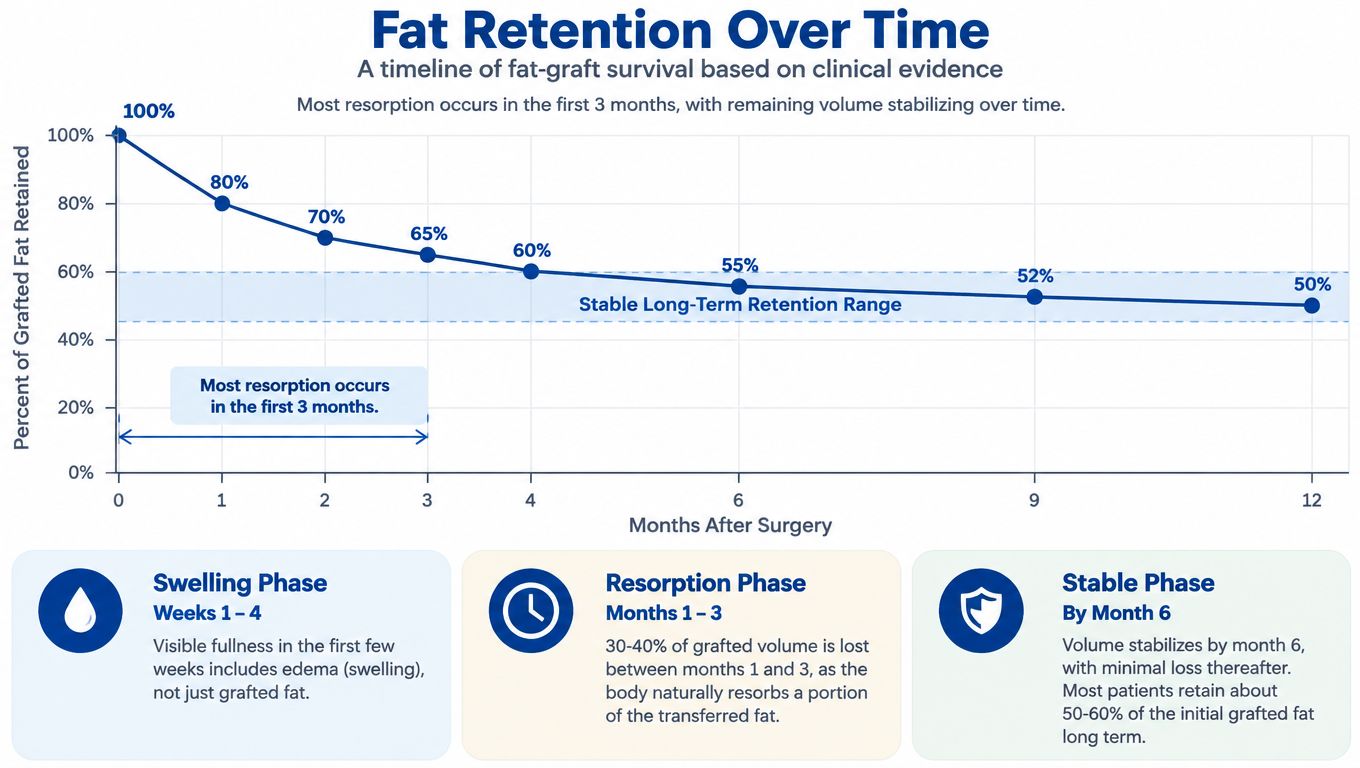
Fat transfer results develop in phases. Immediately after surgery, the treated area contains the grafted fat plus postoperative swelling. During the following weeks and months, some cells establish a blood supply while others are resorbed. The contour gradually settles, and the early appearance shouldn't be treated as the final shape.
Recent gluteal fat-grafting literature reported measurable retention of approximately 77.9% at 3 months and 64.7% at 6 months in one cited analysis (retention analysis in gluteal fat grafting). Those figures come from gluteal fat-grafting literature, not a universal hip-dip formula. They're still useful because they show why an appealing early photograph may not represent the stable long-term contour.
What can influence the settled result
- Weight fluctuation: Transferred fat remains living tissue. Weight gain or loss can change its size, just as it can change other body fat.
- Smoking: Smoking can impair healing and may affect graft survival, so it belongs in the candidacy and aftercare discussion.
- Pressure during recovery: Prolonged pressure on newly grafted areas may compromise the local environment needed for healing.
- Donor limitations: A surgeon can transfer only what can be harvested safely and processed appropriately. More desired volume doesn't automatically make more volume advisable.
- Previous procedures: Prior liposuction or fat transfer may leave less donor fat, altered tissue planes, or asymmetry that changes the plan.
A surgeon should explain whether the gallery represents an early, intermediate, or mature result. For additional patient education about durability, see how long fat-transfer results last. The useful question isn't “How much fat will be injected?” It's “What contour is realistic after healing, and what factors could change it?”
Candidacy and Patient Selection
Good candidates typically have a stable body shape, enough usable donor fat, reasonable skin quality, and a goal that matches what fat grafting can achieve. The physical examination includes the thickness of the lateral-hip soft tissue, the pinchable donor areas, skin elasticity, asymmetry, prior scars, and the relationship between the pelvis and thigh.
Body mass index is only one part of that assessment. A lean patient may have limited donor fat and therefore be suited to a subtle correction rather than a large augmentation. A patient with more available fat may still need a staged plan if the desired volume exceeds what can safely be placed superficially.
Three pathways patients often compare
Awake Butt Lift: This uses local anesthesia and an office-based setting for selected patients. It can address the buttocks and lateral hips, but “awake” describes the anesthesia and setting, not the removal of surgical risk.
Standard BBL: A broader Brazilian Butt Lift may combine liposuction and fat transfer to create more buttock projection or a different waist-to-hip relationship. It may be appropriate when the patient wants more than localized hip-dip softening.
Raise Your Cup: A breast fat-transfer approach isn't a substitute for hip correction, but patients sometimes consider several contouring goals together. The timing, donor-fat requirements, and priorities need to be planned as one overall treatment strategy.
Patients who are actively losing weight, planning pregnancy, or considering future body-contouring procedures may need to delay or revise their plan. Weight stability matters because a later change can alter both the donor areas and the transferred contour.
Comparing Procedural Approaches
The practical distinction between an Awake Butt Lift and a traditional BBL involves anesthesia, facility setting, treatment extent, and recovery planning. The anatomical safety rule doesn't change with the label. Fat placed around the hip or buttock region must remain in the superficial subcutaneous plane above the gluteal fascia.
A procedure performed under local anesthesia can still involve liposuction, tissue trauma, compression, wound care, and postoperative restrictions. Conversely, general anesthesia doesn't determine whether the injection is safe. Cannula control, injection depth, visualization, volume planning, and emergency readiness matter more than the marketing name attached to the approach.
What to ask about the technique
Ask whether the treatment is limited to the lateral hips or includes the buttocks and waist. Ask how the surgeon documents the injection plane and whether real-time ultrasound is used. Ask what happens if the desired volume can't be placed safely in one session.
An overview of fat transfer and the Brazilian Butt Lift can help explain why donor-site liposuction and recipient-site grafting are inseparable parts of the result. The most helpful consultation isn't the one that promises the largest change. It's the one that connects the requested shape to the patient's anatomy and safe tissue capacity.
Safety Considerations Specific to Hip and Buttock Fat Grafting
The central safety principle is anatomical: transferred fat must remain in the subcutaneous tissue above the gluteal fascia. Intramuscular and submuscular injection is contraindicated because fat beneath the fascia may enter or injure deeper vessels and create a potentially fatal fat embolism affecting the heart or lungs (gluteal fat-grafting safety guidance).
Real-time ultrasound can help the surgeon track the cannula tip and confirm that injections remain above the fascia. Professional guidance also supports ultrasound monitoring during gluteal fat grafting (joint safety statement on gluteal fat grafting).
Technical safeguards deserve direct questions
- Cannula design: Guidance recommends a blunt cannula at least 4 millimeters in diameter, while bendable cannulas and mobile connections should be avoided to reduce unintended deep or intravascular penetration (fat-grafting safety recommendations).
- Injection plane: Fat should stay superficial, even when the target is near the lateral buttock.
- Ultrasound use: Ask whether real-time imaging is used during injection, not merely during consultation.
- Staging: If the desired contour requires more fat than can safely be placed superficially, staging is safer than injecting deeper.
- Emergency readiness: Ask about monitoring, emergency protocols, postoperative contact, and escalation instructions.
A review of ultrasound-guided gluteal fat grafting included 6,235 patients and reported no deaths or fat-embolism cases in the analyzed studies. It reported minor complications in 6.32%, including seroma at 2.94%, infection at 0.23%, and fat necrosis at 0.09% (systematic review of ultrasound-guided gluteal fat grafting). These findings don't prove that every lateral-hip procedure has the same risk profile. They do support asking specific technical questions instead of accepting a general statement that the procedure is safe.
Recovery Timeline and Aftercare
The first days after surgery usually involve swelling, drainage or bruising, tenderness, and careful movement. Compression instructions apply to the treated donor areas, while pressure on the grafted region may need to be limited. The exact restrictions depend on the procedure, but patients should receive written guidance about sitting, sleeping, garment use, wound care, and permitted activity.
During the first couple of weeks, the contour can look uneven or unusually full. One side may swell more than the other. Direct pressure, strenuous exercise, and missed follow-up can interfere with recovery, so the after photograph should be understood as the result of both surgery and aftercare.
Three follow-up snapshots
At around three months, the shape may look substantially calmer than it did immediately after surgery, though the contour can continue refining. At six months, the retained graft and donor-site healing provide a more useful basis for judging the result. At twelve months or later, the comparison is more informative still, especially if weight has remained stable.
Increasing pain, rapidly worsening asymmetry, unusual skin discoloration, fever, drainage, or shortness of breath requires prompt contact with the surgical team or urgent medical assessment. A detailed fat-transfer recovery guide can help patients prepare questions, but it can't replace instructions from the surgeon who performed the procedure.
Evaluating Before-and-After Photos Like a Clinician
Start with the baseline. Is the patient's starting anatomy similar to yours in pelvic width, soft-tissue thickness, donor fat, skin quality, and body weight? A photograph of someone with a different foundation can illustrate technique, but it can't reliably predict your result.
Next, inspect the documentation rather than the pose. A trustworthy gallery should make the following information available:
- Treatment zones: Which areas were liposuctioned, and which received fat?
- Injected volume: How much was placed on each side, if that information is available?
- Follow-up interval: Was the image taken during swelling, after early settling, or after a mature result?
- Photography conditions: Are the lighting, garment, camera distance, and position consistent?
- Scope of the gallery: Does it show a range of results or only the most flattering cases?
- Revision context: Are touch-ups or revisions discussed when asymmetry or poor retention occurs?
A clinic should also explain how weight changes can affect the transferred fat and whether a planned result depends on additional procedures. It's reasonable to ask how the practice handles dissatisfaction, residual asymmetry, contour irregularity, or a request for refinement.
Practical rule: If the caption tells you only that the patient looks “better,” but not when the image was taken or what was treated, you're looking at advertising material rather than complete clinical documentation.
The strongest consultation answer won't guarantee that your body will match a gallery. It will explain which parts of the example are relevant, which aren't, and what uncertainty remains.
Quick Reference for Prospective Patients
Green flags include standardized photographs, clear follow-up dates, honest discussion of retention, ultrasound guidance when appropriate, superficial injection planning, and realistic limits based on donor fat.
Red flags include immediate postoperative images presented as final, no distinction between hip correction and full buttock augmentation, unexplained dramatic angles, vague safety answers, or promises of perfect symmetry.
Bring these questions:
- What areas will be treated and why?
- How much donor fat is realistically available?
- Where will the fat be placed?
- Is real-time ultrasound used?
- What happens if the desired volume isn't safe in one session?
- When should the result be judged?
Common terms include donor site, fat retention, subcutaneous plane, graft resorption, and revision. Ideal Face & Body states that it no longer offers breast implant placement, implant-based breast augmentation, or breast implant revision procedures, while distinguishing those discontinued services from consultations about implant-related concerns (current breast-implant service notice).
Ideal Face & Body offers body-contouring consultations, including Awake Butt Lift treatment for selected patients seeking buttock and hip-dip reshaping with their own fat. Review your anatomy, goals, retention expectations, and safety questions with the team by visiting Ideal Face & Body to request a consultation.